|
Having my own Amazon Store Front is like sharing my favorite things list with you all! I hope you love all of the things as much as I do! 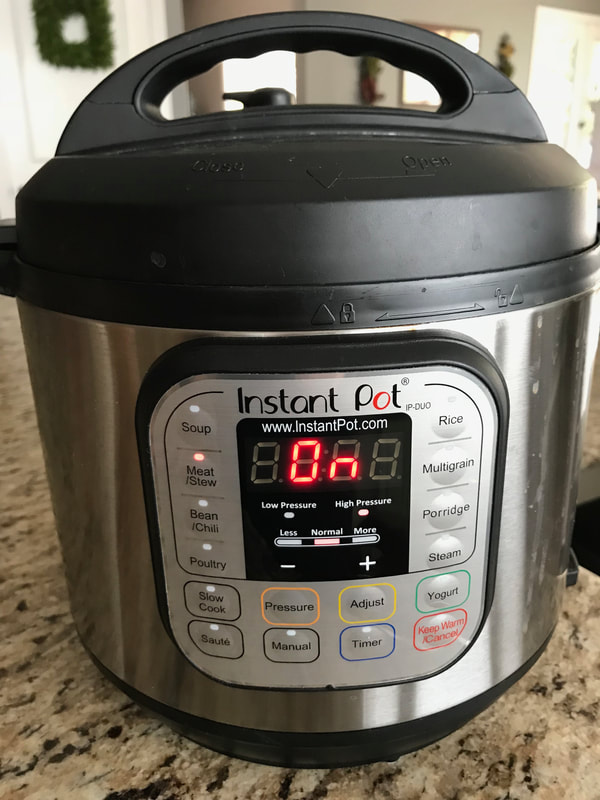 This post may contain affiliate links. Read my policy here if you’d like.
I love Amazon! Seriously, like way too much. The benefit of having items delivered to my door, no delivery fee (with PRIME) Versus I drive to the store and hope they have what I want. I am so thankful to have my own Amazon Store Front Now! I will add items that I love to it and you can shop from it if you want to! If you shop, I do get paid a small commission when you do and it helps me keep doing what I do! Posting more recipes and gluten free life stuff. HOW DO I SHOP? www.amazon.com/shop/goodnessgraciousglutenfree Why I Love Amazon: We are so blessed to live where there is an AMAZON hub so we get same-day delivery, Amazon Prime NOW, and grocery delivery through Whole Foods. I am addicted! BUT also it saves me a ton of time! I love being able to order my Whole Foods or Amazon groceries from my phone and they arrive 2-4 hours later! It’s the best! In that time I can film a video, make a recipe, and post it to my website! Or, watch a movie, hang out with my family and friends. So many options. Why You Should Shop From My Amazon Store: You should shop from my Amazon store because you want to support my quest to help people live a wonderful gluten free life! You might also love the dish I am using in my picture and want to get it for yourself or for a gift! Which in turn supports my quest lol. I have always used the product I am recommending which means I have tried it and I approve. I hope you love the items as much as I do. The great news is Amazon returns most things if it isn’t what you were hoping. As Always, Best Wishes for Gluten Free Dishes! XO, Michelle
0 Comments
These gluten free BBQ Pressure Cooker Ribs are super delicious and fall off the bone! The Instant Pot makes them easy for a weeknight dinner! 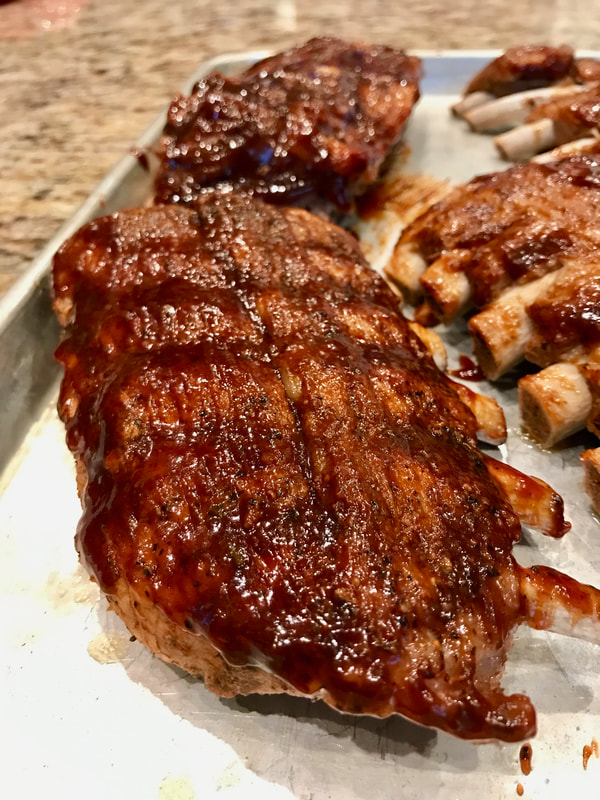 Gluten Free BBQ Pressure cooker or Instant Pot ribs are a quick weeknight meal! Did you get a pressure cooker or an Instant Pot this year? Are you looking for a fast and delicious meal for your family? I made these quick and easy pressure cooker ribs in less than 45 minutes! It was one of those days when I couldn’t decide what to make for dinner. I have that problem too occasionally just like everyone else. It was a lazy rainy day here and we had company in town. I couldn’t decide what I wanted to make for dinner. Should we go out to eat? What should we have? Finally, at about 3 p.m. it came to me Ribs! The only problem was they were in the freezer. So, I quickly took them out of the freezer and put them in a zip lock bag in a bowl full of cool water. I needed to thaw them a little so I could separate them. What do I Need to Make These Gluten Free BBQ Pressure Cooker Ribs? You will need a pressure cooker or an Instant Pot. Pork Baby Back Ribs BBQ sauce Dry Rub seasoning That’s it! Super easy! I finished the ribs in our smoker to add the smoky flavor and make the sauce sticky, but you could finish them in the oven. You really don’t want to cook them, just heat up the sauce. How Do I Make These Delicious Looking Ribs? So glad you asked! I would love to share that with you! To begin, remove the silver skin from your ribs. It’s kinda gross, but it makes a huge difference on how tender your ribs turn out! The best way I have found to remove it is to use a paper towel and grab it and pull. It should just pull off Here’s a YOUTUBE video on how to do it: Like I said it’s a little gross, but once you do it a few times it’s actually pretty easy. Rub your ribs with your favorite dry rub. I used Paleo Powder. Place your Ribs into your pressure cooker standing up so they curve around. You can cut them to fit. Add about 1/2 of a cup of water to the bottom of the pot. Put your lid on and turn the pressure cooker to manual pressure for 35 minutes. Now you have time to sit back and relax or make a side dish to go with the pressure cooker ribs. Once the pressure cooker is finished, CAREFULLY release the pressure. Open your lid and your ribs will be very tender. Carefully lift them onto a sheet pan and brush your favorite sauce on them. You can put them in a 350 degree oven for about 10 minutes to get the sauce sticky. I put mine in my smoker for about 15 minutes on 225 just to get the smokey taste and make the sauce sticky. They should be falling off of the bone and super yummy! I am seriously drooling right now typing this out. I might have to go heat some up…. hang on BRB. LOL. Pin Now Make Them LATER! 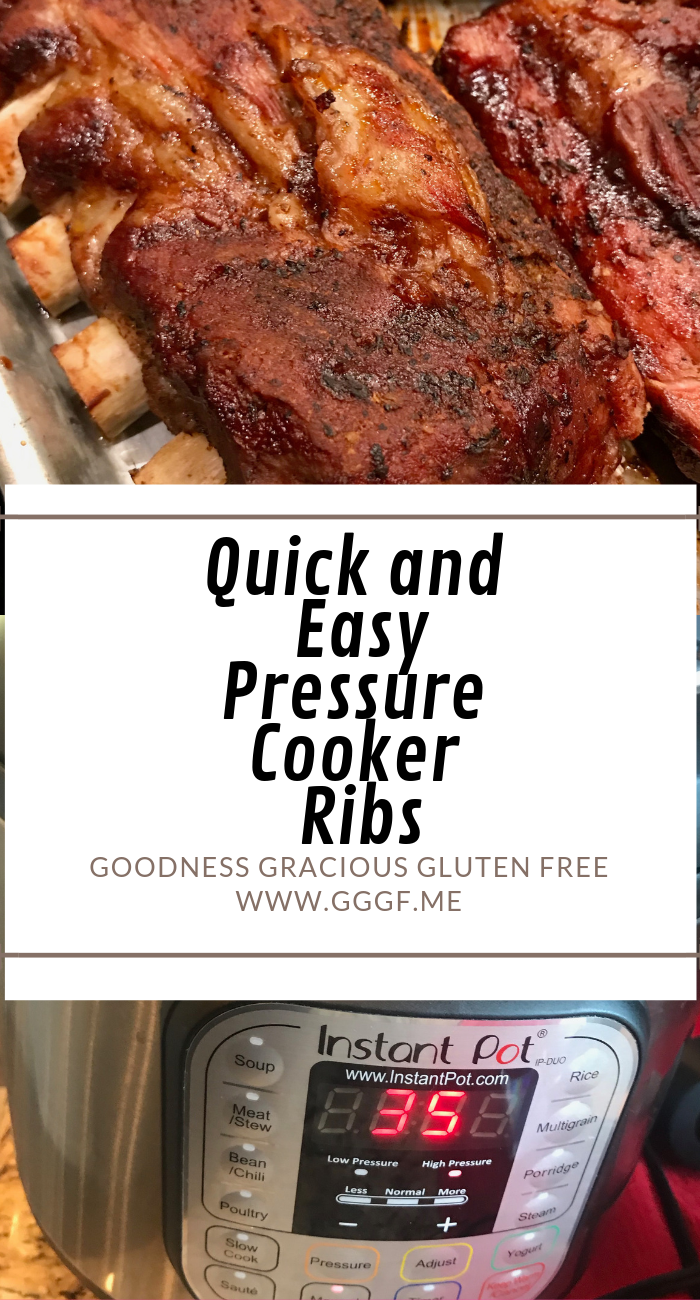 Here’s The Printable Recipe
Quick and Easy Pressure Cooker RibsRibs made in your Instant Pot or Pressure Cooker are fall off the bone delicious and make a weekend meal into a weeknight meal. On the table in 45 minutes! INGREDIENTS
INSTRUCTIONS
Hope you love these quick and easy pressure cooker ribs as much as we do! You might like to pair them with My Favorite Keto Wings and a nice glass of Gluten Free and Keto Wine! As Always, Best Wishes for Gluten Free Dishes! XO, Michelle These easy gluten free stuffed Jalapenos are the perfect appetizer when you want a little spice and lots of flavors! 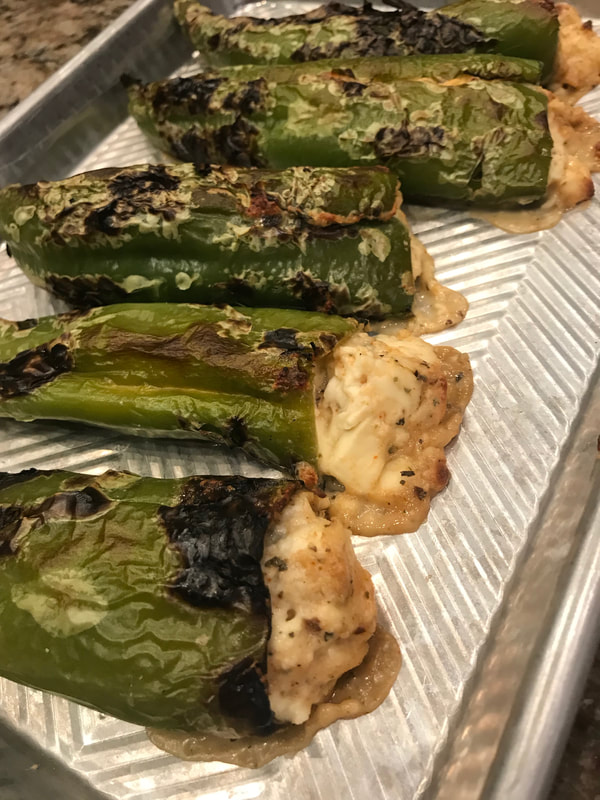 Three Ingredients is All YOU NEED! Are you looking for a quick side dish, appetizer, or meal? My 3 ingredient stuffed jalapenos are just the thing if you like a little or a lot of spice! The only three ingredients you need are jalapenos, cream cheese, and honey. If you want this to be your meal I would add one more ingredient and that would be cooked chicken. Just because I like to have protein at every meal. How Do I Make Stuffed Jalapenos? That’s the best part! It’s super easy to make these stuffed jalapenos. I recommend wearing rubber gloves when you are taking the seeds and ribs out of the peppers so you don’t burn your hands or accidentally rub your eye. It’s very painful and takes a while to stop hurting. I am giving this advice from experience! You will need to buy some jalapenos. If you want a whole meal, buy big ones. If you want an appetizer or side buy regular sized ones. You can also use Anaheim or Poblano peppers if you don’t want it as spicy. They are also larger so you can stuff more in them. Use your best judgment on which peppers you would like to use. Let one package of cream cheese come to room temperature for about 15 minutes. This makes it easy to stuff into your pepper and mix in the honey. In a bowl, mix the cream cheese with about 1/3 cup of honey. You can adjust the sweetness to your preference. I roasted my jalapenos over my gas stove because it was raining outside, but you can blister them using the grill or your oven on broil. I wanted to char them a little so they soften and are easier to remove the ribs without cutting them all the way open. This is where I put on my gloves. Cut the end off of the pepper. Carefully cut the ribs out and remove the seeds. You want to do this to cut some of the spice. If you want it really warm, leave the ribs and just remove the seeds. Stuff each pepper with the cream cheese mixture. I used a small spoon and tried to push it all the way to the bottom so each bite had some filling. Bake in the oven at 400 degrees for about 15 minutes or until the cheese is melting. I like the pepper still a little crunchy so I don’t overcook it. Serve and enjoy! If you are looking for some other appetizer ideas you might like these: My Famous Guacamole Buffalo Chicken Dip Pin This NOW Make it LATER! 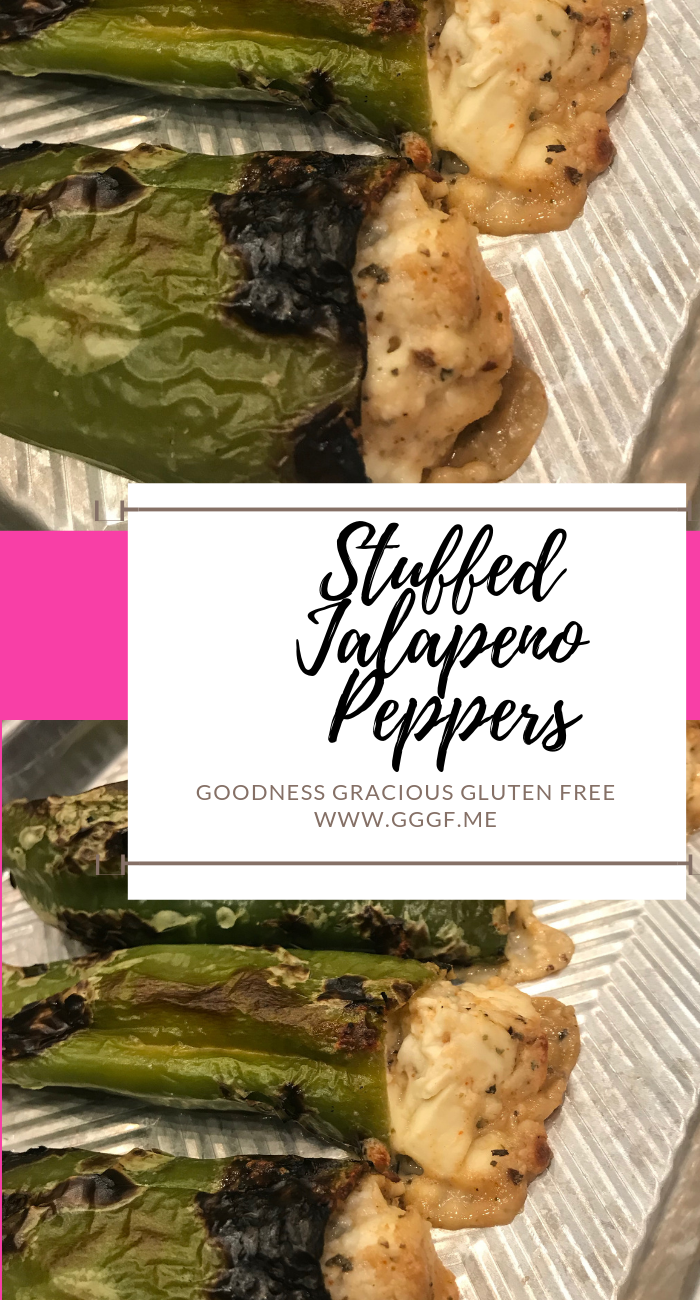 Here’s the RECIPE for Stuffed Jalapenos!
Stuffed Jalapeños Spicy and Sweet, Creamy and delicious! Who could ask for anything more! INGREDIENTS
INSTRUCTIONS
Hope this recipe spices up your life or at least your dinner, appetizer, or side! As Always, Best Wishes for Gluten Free Dishes! XO, Michelle This gluten free crunchy Thai Cabbage Salad is packed full of delicious peanut flavor and lots of crunchy veggies!  Why I Crave This Thai Cabbage Salad! This Thai cabbage salad is so easy to make and totally satisfies my craving for crunch! It is slightly salty and a little sweet so it is the perfect combination of delicious flavors! If you like a good salad and fresh flavors you will crave this thai cabbage salad too! I literally was driving home from an appointment today and stopped at the store for nappa cabbage to make this salad. I had all of the other ingredients but the napa cabbage. And Voila! Lunch was served. Yummy! I am excited to make it again. It has been cloudy and cool in Arizona lately and usually that means I crave comfort food. Stews and soups that are hearty and filling. Not today! I totally wanted something light and crunchy. We had some leftover rotissery chicken in the fridge and that is what I served with it for some protein. I also love this with Pecan Crusted Ahi Tuna with Mango Salsa! What Do You Need To Make This? This salad goes together in just a few minutes and is super easy to make! You will need the following ingredients to whip this up: One head of Napa Cabbage A bunch of green onions Shredded Carrots- you can buy them pre shredded or shred your own. A red, yellow or orange pepper or combination of them. Peanuts Gluten Free Soy sauce or Coconut Aminos Rice Wine Vinegar Sesame Oil Sesame Seeds Sugar or sweetener Optional ingredients: You can really add any veggies you would like to this salad. The Napa Cabbage makes it super crunchy and delicious. I sometimes add snap peas, apple, pear, or bean sprouts. First wash all your produce and allow to dry for a few minutes. Chop the end off the Napa Cabbage and separate the leaves. Slice the leaves of the cabbage the long way so they are bite sized pieces. This just makes it easier to eat. Then chop it up. Chop the rest of the veggies into bite size pieces. Toast the sesame seeds in a pan on medium heat. Stir so they don’t burn. Set aside. Make the dressing in a bowl. It has soy sauce or coconut aminos, rice vinegar, sesame oil and a little sugar in it. You could also add ginger or Chinese 5 spice to it if you want to spice it up. As well as Chili sauce if you really want to kick up the heat. Add the chopped veggies to the dressing in a big bowl. Toss. Add the peanuts and toasted sesame seeds. Voila! You are ready to eat. Pair this salad with your favorite protein for a complete meal. Pin This Now Make It Later! 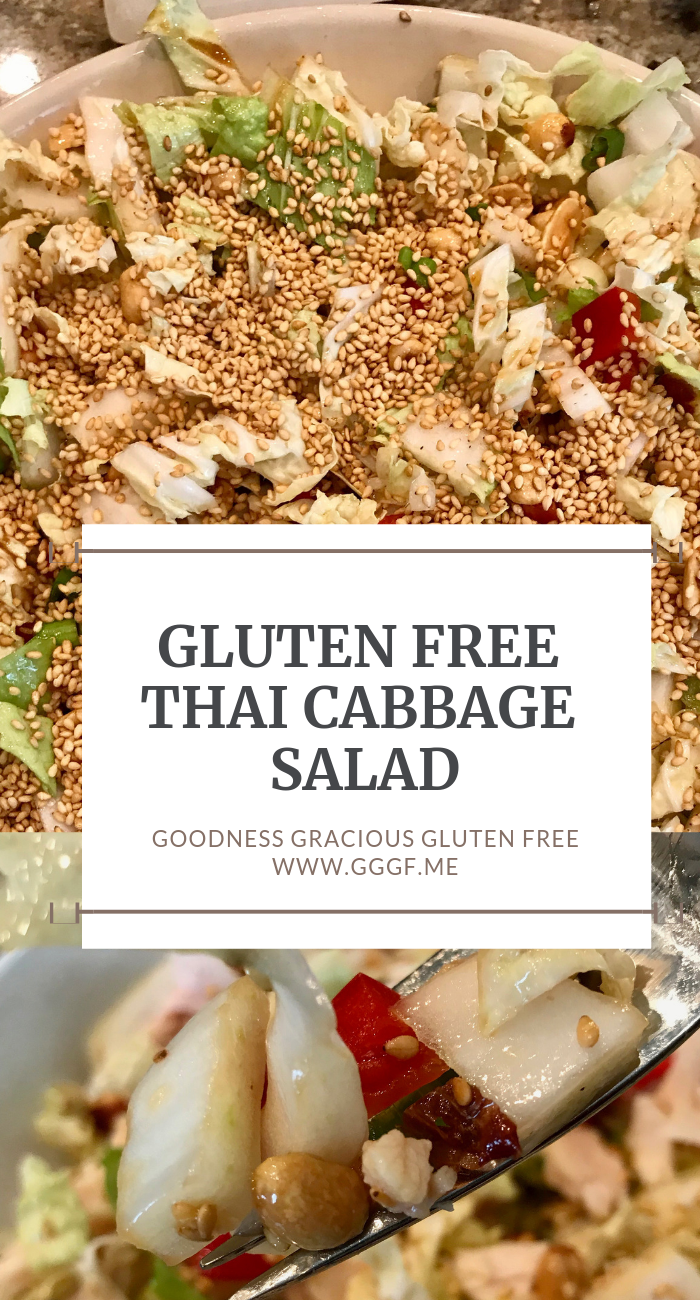 Here is the actual recipe for this Deliciously Crunchy Thai Cabbage Salad!
Gluten Free Crunchy Thai Salad You will love this deliciously crunchy salad full of flavor! INGREDIENTS
INSTRUCTIONS
As Always, Best Wishes for Gluten Free Dishes! XO, Michelle This gluten free Instant Pot Teriyaki beef is a quick and easy dinner cooked in the Instant Pot or Pressure Cooker! 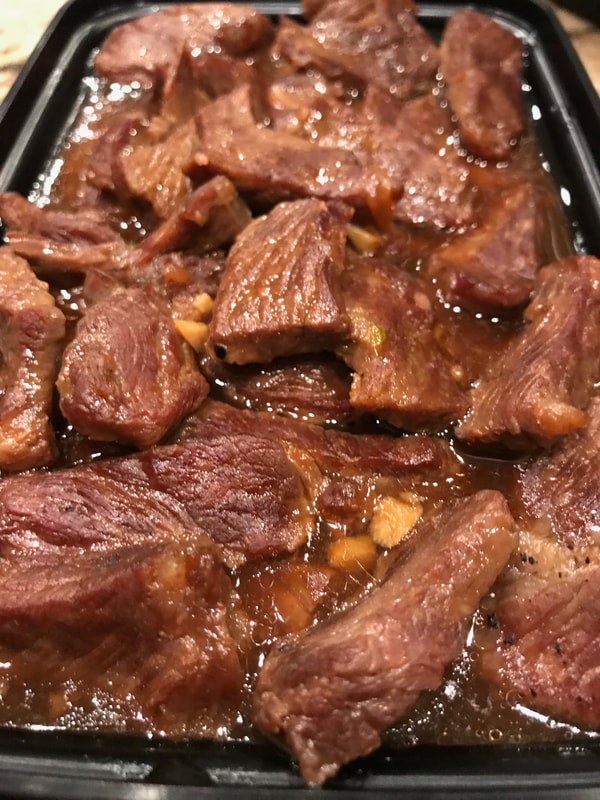 Did you get an Instant Pot for Christmas? If you received an instant pot for Christmas here is a simple recipe for you to make with your new gift and one of our favorites… Teriyaki beef! I wanted to make a recipe that my daughter in college could throw together in a few minutes and have a yummy meal. We bought her the additional ceramic insert so she can cook rice or other veggies at the same time as meat in her pressure cooker to make it more efficient. If you wanted to you could make this recipe with chicken or pork as well instead of beef. You can also add veggies if you want to! What Do I Need To Make This Recipe? You will need an Instant Pot or Pressure Cooker to start off with. Also: 2 pounds of sliced beef, pork, or chicken. I used a strip roast that I cut into thin slices. 1 cup of water 5 TBSP of packed brown sugar. Or less- I like mine less sweet but my family likes it sweeter. So the decision is yours 1 large garlic clove minced. 1/2 tsp grated ginger or powdered ginger. 2 tsp honey. 2 TBSP cornstarch. 1/4 cup water. 1 cup of water and 1 cup or rice if you want to make it in the ceramic pot. As well as any veggies you would like to add. DO NOT add the cornstarch and 1/4 cup of water in the beginning when you put the ingredients into the pressure cooker on sauté. You are going to make a slurry to thicken the sauce with them. A slurry is a mixture of a thickener like cornstarch or flour and a liquid like water that gets whisked together and added to thicken a dish. Here’s what to do with the ingredients: Turn your pressure cooker or instant pot on to saute mode. This allows you to bring the liquid to a boil and make your sauce. I love this setting for browning or precooking meat in the Instant Pot. Add all of the ingredients except the 1/4 cup of water and 2 TBSP of cornstarch. Whisk it all together. Continue to stir occasionally until the temperature comes up and it is getting thick. Once it is thick, turn the pot off. Add your meat and give it a stir to coat the meat in the sauce. If you want to add veggies you can do it now. If you want to make rice in the ceramic cooker, put the stand into the meat. Add 1 cup of rice and 1 cup of water into the ceramic cooker and put the silicon lid on top. Put it in the metal lifting rack. Place into the pressure cooker. Put the lid on and turn it on to manual pressure mode. Set the time for 20 minutes. Make sure it pressurized correctly and then wait for your food to be done. Super easy and delicious! Here’s the Video on how to make this recipe: Similar Recipes You Might Like: Cheesy Polenta with Crispy Onions Paleo Chili Stuffed Sweet Potato Honey Garlic Chicken Thighs in the Crockpot! Gluten Free Bacon and Pineapple Fried Rice Pin Now Make Later! 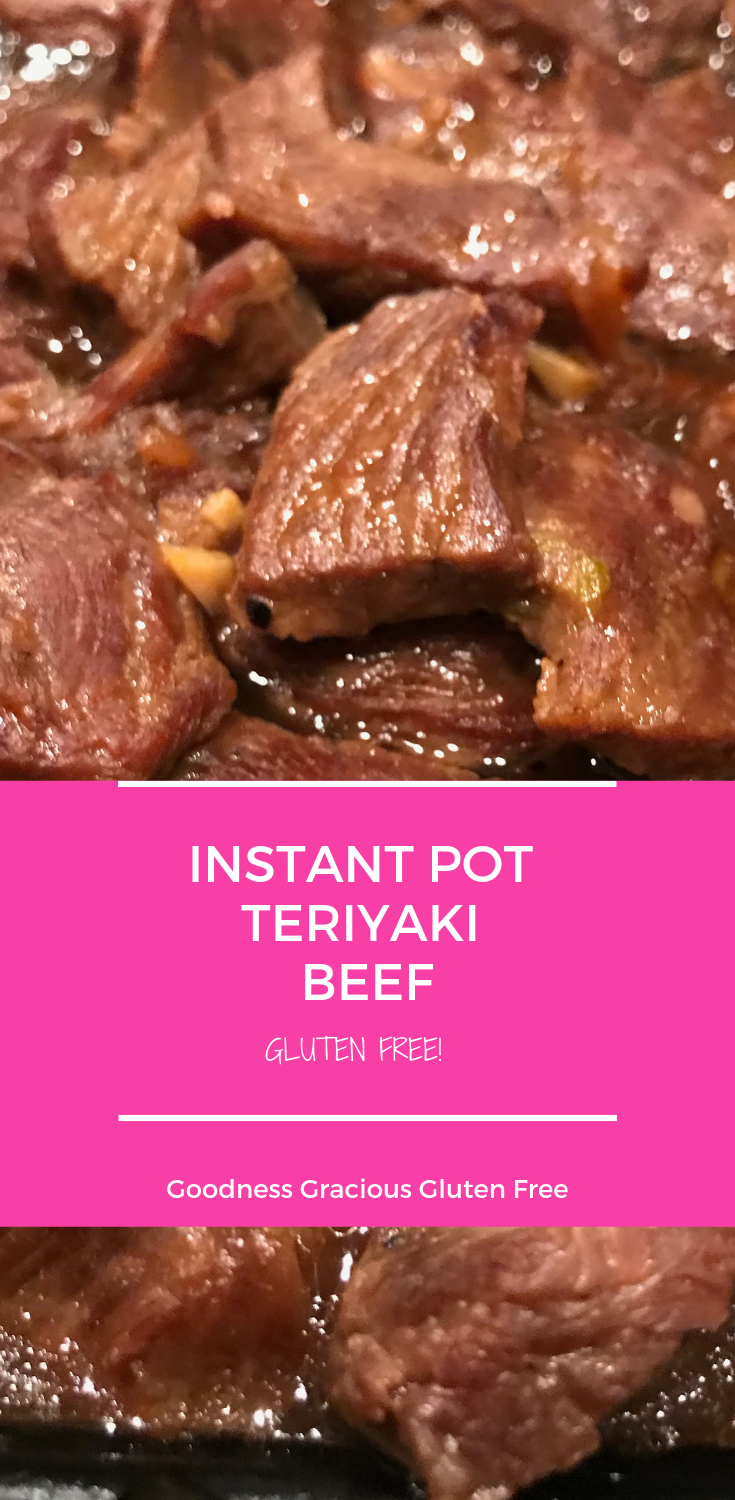 Here’s The Recipe!Instant Pot Teryaki Beef- Gluten FreeAn easy meal made in your pressure cooker or instant pot! Delicious and fast!
SERVINGS 4 people INGREDIENTS
INSTRUCTIONS
Hope you enjoy this recipe as much as we do! Feel free to play with the sweetness to your taste! I like mine less sweet but the majority of my family likes it with this much sweetness in it. Have a great rest of your day! As Always, Best Wishes for Gluten Free Dishes! XO, Michelle |

Hey There!I am so glad you are here! Categories
All
Archives
June 2023
|

 RSS Feed
Click to upload Footer Background below