|
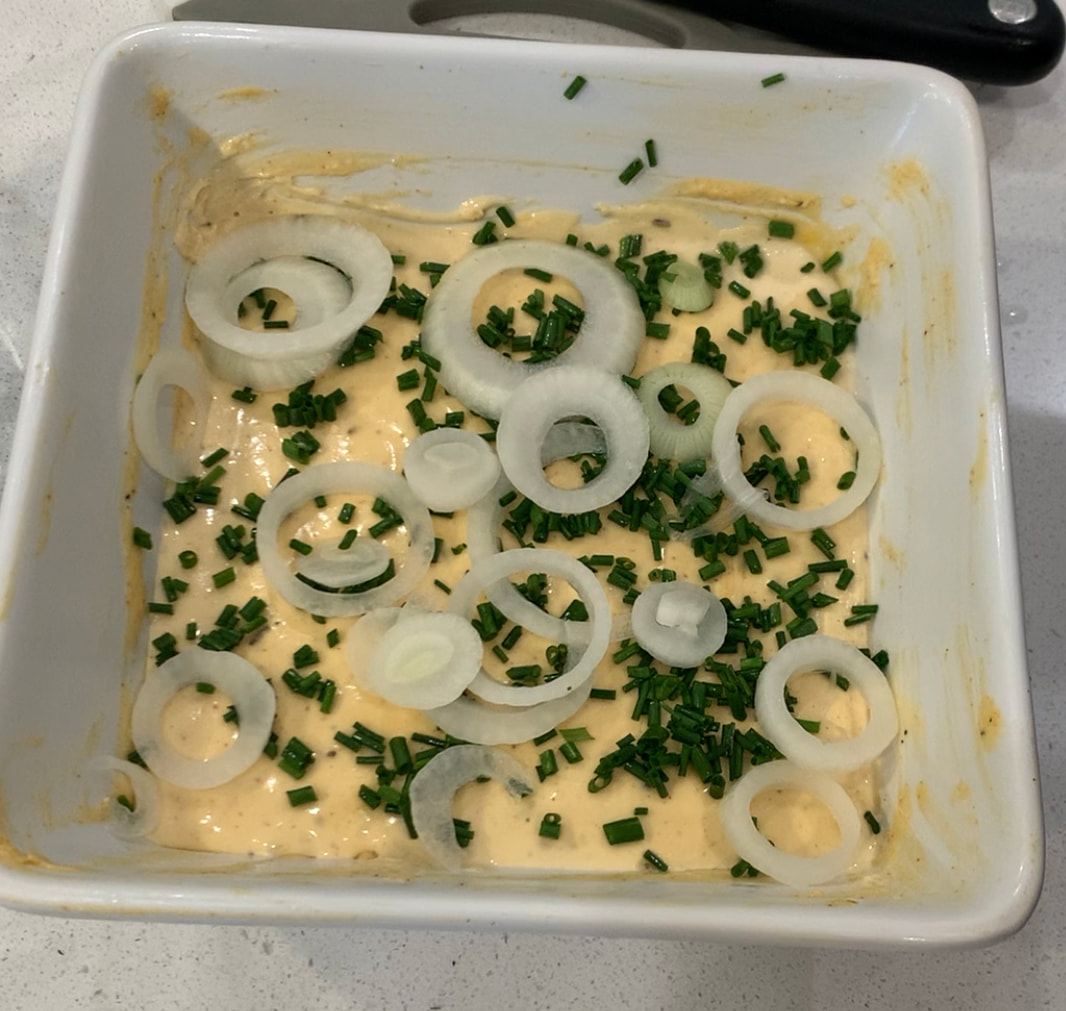
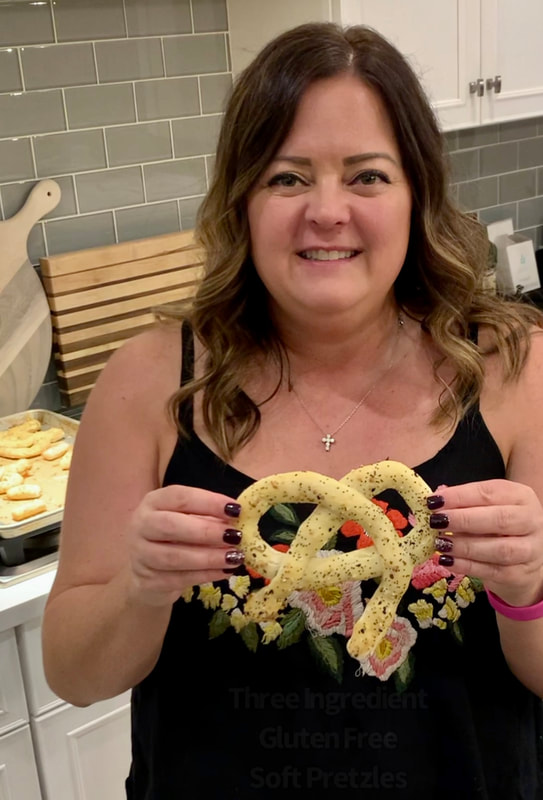
Pair this delicious Obatzda, a German Beer Cheese Spread that I made gluten free, with my three ingredient gluten free soft pretzels and you have the perfect snack! We make them as part of our Gluten Free Octoberfest dinner! It is full of flavor and can be made ahead of time so you can pull it out when you are ready!
0 Comments
Have you tried these three ingredient gluten free soft pretzels yet? My daughter told me about this TikTok trend and I had to try it! And, it's the perfect timing for Octoberfest Celebrations!!
Gluten Free Arepas are super easy to make and have been made popular lately by the Disney movie Encanto! Have you seen it yet?

Here’s what you need to make gluten free arepas:You will need a bag of GOYA Masarepa or PAN White Cornmeal that is precooked.
I used the Goya Masarepa flour to make these babies! These two work the best for making them IMO. Warm Water Salt If you want to make them with a cheese filling you will need shredded cheese or queso fresco or your favorite cheese! I also like to fill them with shredded meat, avocado, and shredded cheese… yum! If you purchase the flour from my Amazon link, I will receive a small commission. Thank you! Here are my policies and disclosures:) I messaged my friend Gaby, who is from Columbia to ask her for her pro tips when making these! Thank you Gaby for your help! Here’s how to make them: I followed the instructions on the GOYA Masarepa package. I added on to it since it ended after making the dough lol. In a bowl, add 2 1/2 cups of warm water, 2 Cups of Masarepa, and 1 tsp salt (I did a pinch because I didn’t measure it lol) Stir together until combined. Let it sit for 5 minutes. After the 5 minutes, USE WET HANDS to knead the dough. I kneaded it on a Silpat mat so it wouldn’t stick. Start heating your skillet with some olive oil in it. If you are not adding cheese as a filling, form them into thick pancake shapes. If you are adding cheese filling, hold the pancake-like shape in the palm of your hand and make a little well. Put the cheese in there. Cover the cheese up with a little dough. Press the dough all around it so none will come out during cooking. If the dough gets sticky, wet your hands again. This really helps! Once you have them made, pan fry them for about 3-4 minutes per side until they are browned and cooked through. The cheese filling ones will have melty cheese on the inside! Continue until all of them are cooked. Once they are cooled a little, you can cut them 3/4 of the way around and add the shredded meat to them or your favorite stuffing ingredients. You might also like Gluten Free Empanadas! Pin this now and make it later! 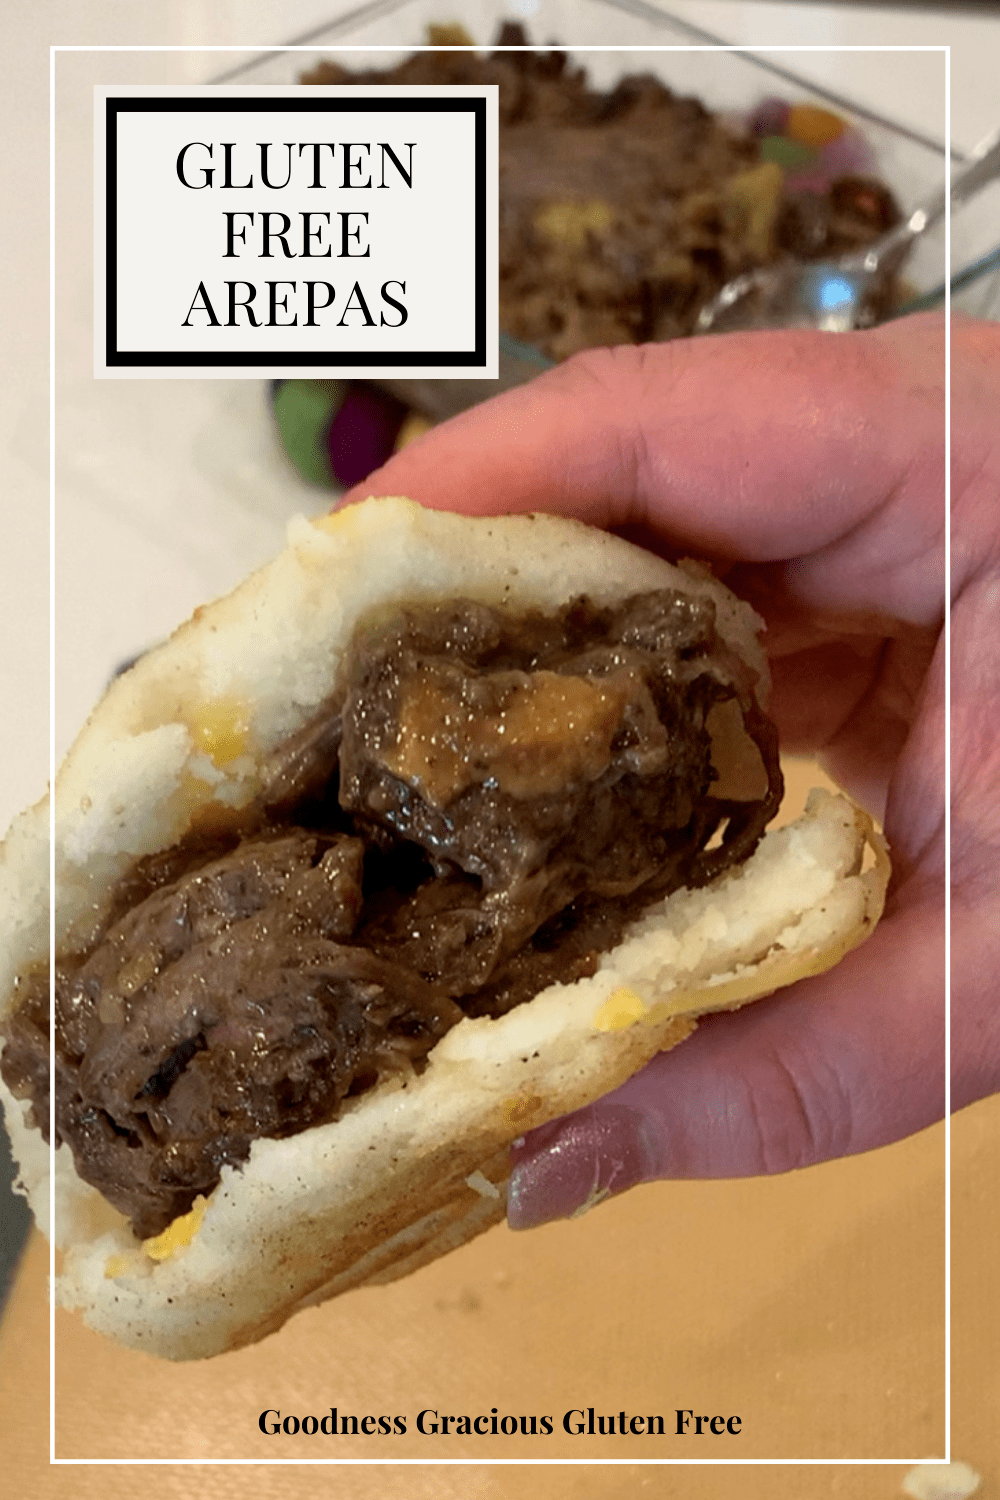
Here’s some Arepa filling ideas:
Shredded Beef- I used leftover Pot Roast Meat and it was yummy! Shredded Chicken- I like to make Salsa Chicken in my Instant Pot for this! Avocado or Guacamole Black Beans Cheese Butter Ham, Pickles, and Cheese- kind of like a Cuban Sandwich (I got the idea from Quiero Arepas) Breakfast ingredients such as eggs, sausage, and cheese. We went to Quiero Arepas when we were in Denver and I loved the Pollo Guisado one we had there! If you are looking for more ideas of where to eat in Denver check out my Gluten Free Guide to Denver! Here's The Video of How To Make These Delicious Arepas!
prep time: 15 MINUTES
cook time: 15 MINUTES total time: 30 MINUTES These gluten free arepas are super easy to make and delicious! You can fill them with shredded meat, cheese or your favorite fillings! Ingredients
I followed the instructions on the GOYA Masarepa package. I added on to it since it ended after making the dough lol. In a bowl, add 2 1/2 cups of warm water, 2 Cups of Masarepa, and 1 tsp salt (I did a pinch because I didn’t measure it lol) Stir together until combined. Let it sit for 5 minutes. After 5 minutes, USE WET HANDS to knead the dough. I kneaded it on a Silpat mat so it wouldn’t stick. Start heating your skillet with some olive oil in it. If you are not adding cheese as a filling, form them into thick pancake shapes. If you are adding cheese filling, hold the pancake-like shape in the palm of your hand and make a little well. Put the cheese in there. Cover the cheese up with a little dough. Press the dough all around it so none will come out during cooking. If the dough gets sticky, wet your hands again. This really helps! Once you have them made, pan fry them for about 3-4 minutes per side until they are browned and cooked through. The cheese filling ones will have melty cheese on the inside! Continue until all of them are cooked. Once they are cooled a little, you can cut them 3/4 of the way around and add the shredded meat to them or your favorite stuffing ingredients. © Michelle Bock I wish I could heal the world with my food like Julieta’s arepas did in Encanto! Sadly I can’t, but I hope you enjoy the recipe! As Always, Best Wishes for Gluten Free Dishes! XO, Michelle These spooky cheese cutouts for a gluten free Halloween charcuterie are so cute and would look great on any meat and cheese tray! 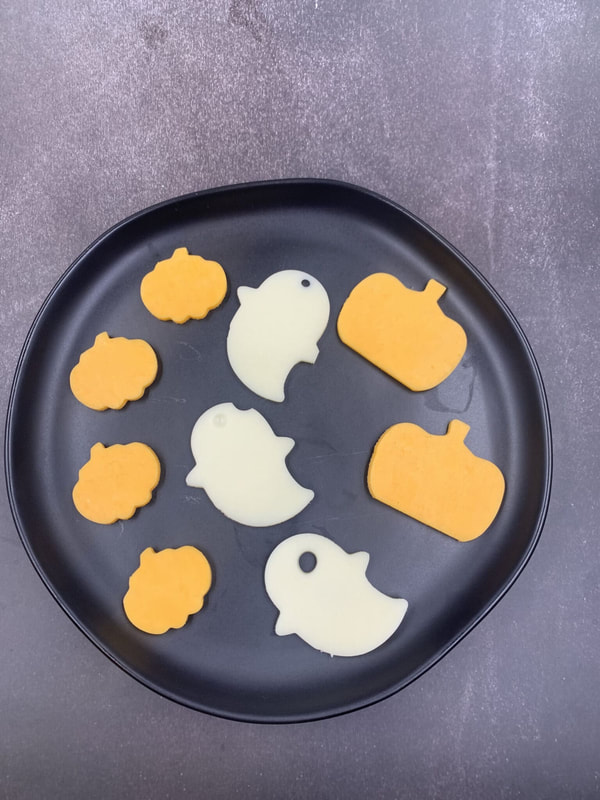 These spooky cheese cutouts are so cute and easy to make! I am going to add them to my gluten free Halloween Charcuterie this year! So adorable and they add a cute spooky touch to your board!
How do I make these Spooky Cheese cutouts?I found these super cute mini Halloween cookie cutters on Amazon! They also work perfectly for mini sugar cookie cutouts too! If you order the cookie cutters from the link on Amazon, I will get a small commission. Here are my policies and disclosures. You can choose your favorite cheese flavors and slice them into rectangles. Then just use the cookie cutters to cut out shapes for your charcuterie! Super easy! I love the swiss cheese slices for the ghost shapes because the holes in the cheese kinda look like eye holes for the ghost. If you like this Halloween idea, you might also like these: Gluten free Mummy Dogs Gluten Free Spooky Calzones Spider Eggs Caramel Apple Martini Here’s some ideas for ingredients for your Halloween Charcuterie Board: Spooky cheese cutouts Salami wrapped olives with pimento to look like eyeballs Spider Eggs Gluten Free Mini Mummy Stuffed Peppers Green olive with pimentos- eyeballs What are your Halloween Traditions? Do you have Halloween traditions in your family? I have to be honest, Halloween is not my favorite holiday. However, I love making festive foods for every holiday! When our girls were little we always dressed up as a family theme. Once they became teenagers that didn’t happen as much! I always made a pot of chili and we invited our friends and family over to sit on our porch and hand out candy. It was a fun way to involve them in taking the kids trick or treating. I hope you have a safe and not too spooky Halloween! As Always, Best Wishes for Gluten Free Dishes! XO, Michelle
Gluten Free Mini Mummy Stuffed Peppers are a super cute appetizer for Halloween!
These super cute Gluten Free Mini Mummy Stuffed Peppers are a delicious Halloween appetizer!
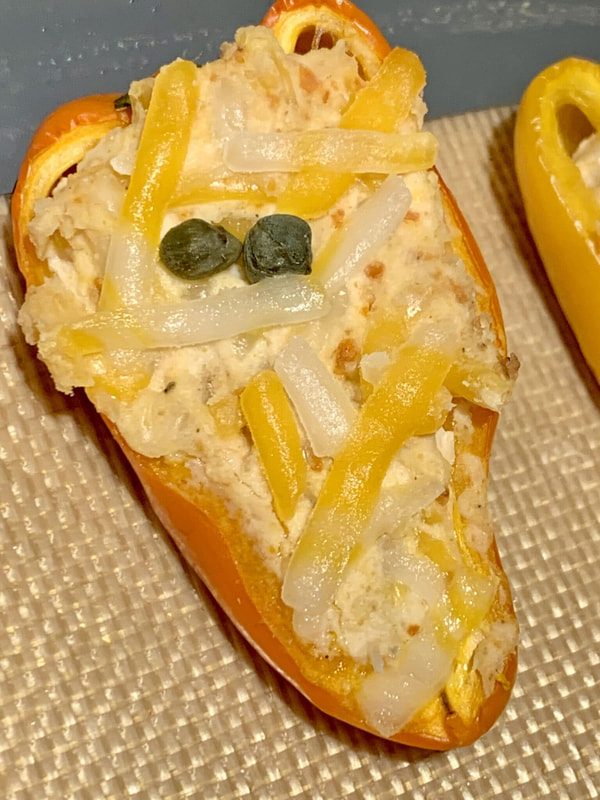
Halloween is just around the corner! I love whipping up cute foods for the evening! Since it can be a super busy day with getting the kids out trick or treating, I usually make a few appetizers to have out for snacking. I love to make a big pot of instant pot chili or my Mummy Meatloaf. Both are protein-packed and perfect for a night of sweet treats! Here’s what you need to make these Mini Mummy Stuffed Peppers: Mini peppers Cream cheese or dairy free cream cheese. Shredded cheddar cheese or dairy free shredded cheddar cheese. Taco seasoning- a gluten free variety. Thick shredded cheese for on top to make the mummy look, or pull apart string cheese. Use dairy free if you want them to be nondairy. A jar of gluten free capers. Optional ingredients- green onions, chopped cooked bacon, hot sauce, chopped chicken breast, etc. 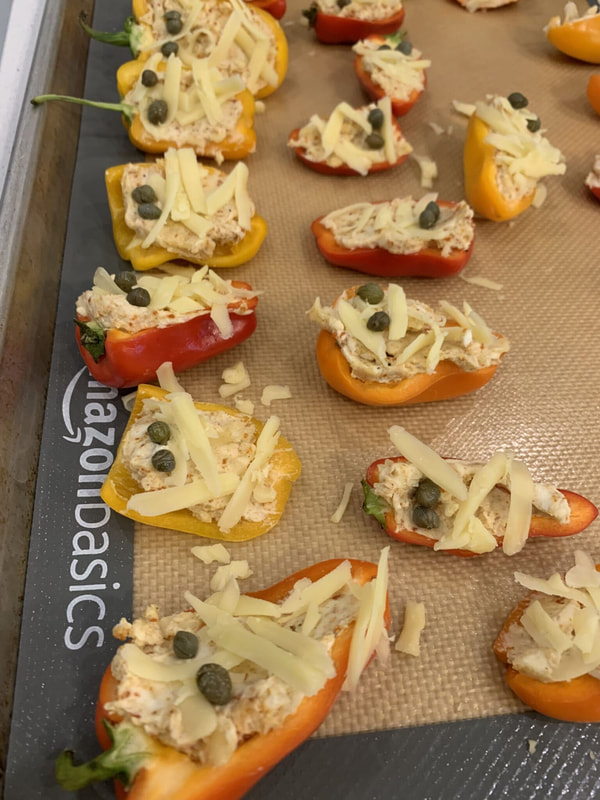
Here’s how you make them:
Wash and dry your peppers. Cut them in half the long way. Don’t remove the stem otherwise, the filling can ooze out the top. Remove the seeds. Mix the other ingredients together in a bowl except for the thick shredded cheese. Scoop the filling into each mini pepper. Put two capers on each pepper to make eyes. Arrange the thick shredded cheese or string cheese on the pepper to make it look like a mummy. Bake in the oven for about 15 minutes or until the cheese starts to melt. Serve with your favorite Spooky Halloween foods. Pin now and make it later. 
Here’s the recipe for these mini mummy stuffed peppers!
Gluten Free Mini Mummy Stuffed Peppers A Spooktacular appetizer for Halloween! INGREDIENTS
As Always, Best Wishes for Gluten Free Dishes! XO, Michelle I love when fall arrives and all of the pumpkin flavors come out! This gluten free pumpkin spice granola is a delicious fall food and all year long IMO! 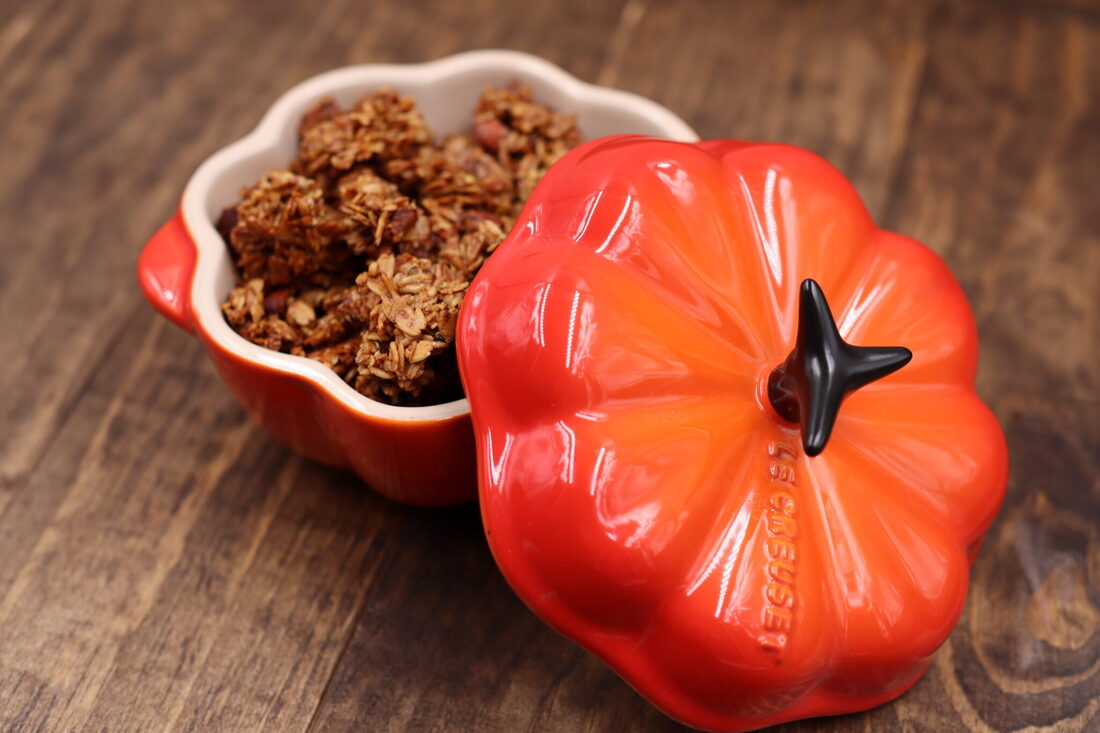 This gluten-free pumpkin spice granola is the perfect breakfast or snack year-round but I always seem to make it as the weather gets cooler. I am all about everything pumpkin spice in the fall, however if you are over the pumpkin spice feels you can leave that ingredient out and it will still be delicious! I love that you put all the ingredients into a big bowl, mix it up, and then bake it! Super easy and fast to make. Boom! What Do I Need To Make This Granola? This is where the fun comes in! I will share with you what I use to make my favorite granola, but you can customize it! If you don’t like an ingredient you don’t have to have it in your granola! I use Montana Gluten-Free Oats. They are purity protocol and delicious. If you want to use my promo code to purchase from them here it is It is valid until 1/1/21 trymgf Raw nuts and or seeds. I use Terrasoul Superfoods pumpkin seeds and Sunflower seeds. They are so yummy! like to also add raw pecans or almonds too. Chop them into smaller pieces so they blend into the consistency of the other ingredients. 1/2 Cup Hemp Seeds. I used Manitoba Harvest. 1 tsp Pumpkin Pie Spice if you want that fall feel. 1 tsp Cinnamon 1/2 Cup melted coconut oil 1 large pinch sea salt. I use Redmonds. 1/2 cup Honey or Maple Syrup. For the fall feels I used Maple Syrup. 1 tsp Vanilla Extract A few handfuls of mini chocolate chips OPTIONAL INGREDIENTS: Other nuts and seeds you like. Cacao nibs. Sunflower seeds. Dried fruit. Chocolate chips. Put all ingredients into a big bowl except dried fruit, chocolate, and cacao nibs if you are using, mix others together. Put a piece of parchment paper on a baking sheet. Pour the granola mixture onto the parchment. Spread it into a flat layer. Bake in a 350-degree oven for about 30 minutes until it starts to brown. Remove from the oven and allow it to cool. Once it is cool, add dried fruit, chocolate, and cacao to the mix while you break it into pieces and store it in an airtight container. Serve it with yogurt or snack on it on its own! PIN THIS AND MAKE IT LATER: 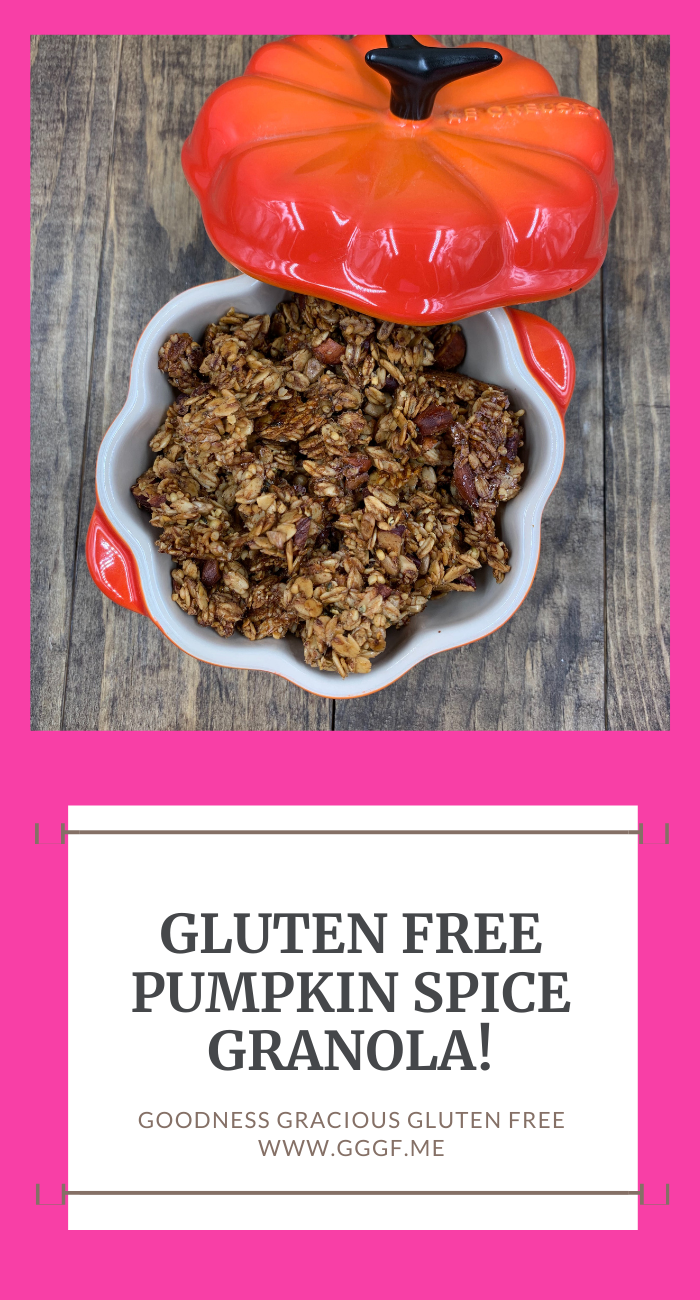 HERE’S THE VIDEO: If you purchase something from the links on my website I may get affiliate income. Here are my policies and disclosures.
If you like this recipe you might also like: Gluten Free Meaty Breakfast Casserole Breakfast Pizza- Gluten Free Pumpkin Chia Pudding HERE’S THE RECIPE: Gluten Free Pumpkin Spice GranolaThis delicious baked granola has all the flavors of fall! INGREDIENTS
INSTRUCTIONS
I hope you love this fall flavored Gluten Free Baked Granola! As Always, Best Wishes for Gluten Free Dishes! XO, Michelle These gluten free double chocolate banana muffins are a great way to use up over ripe bananas! So chocolaty and delicious! 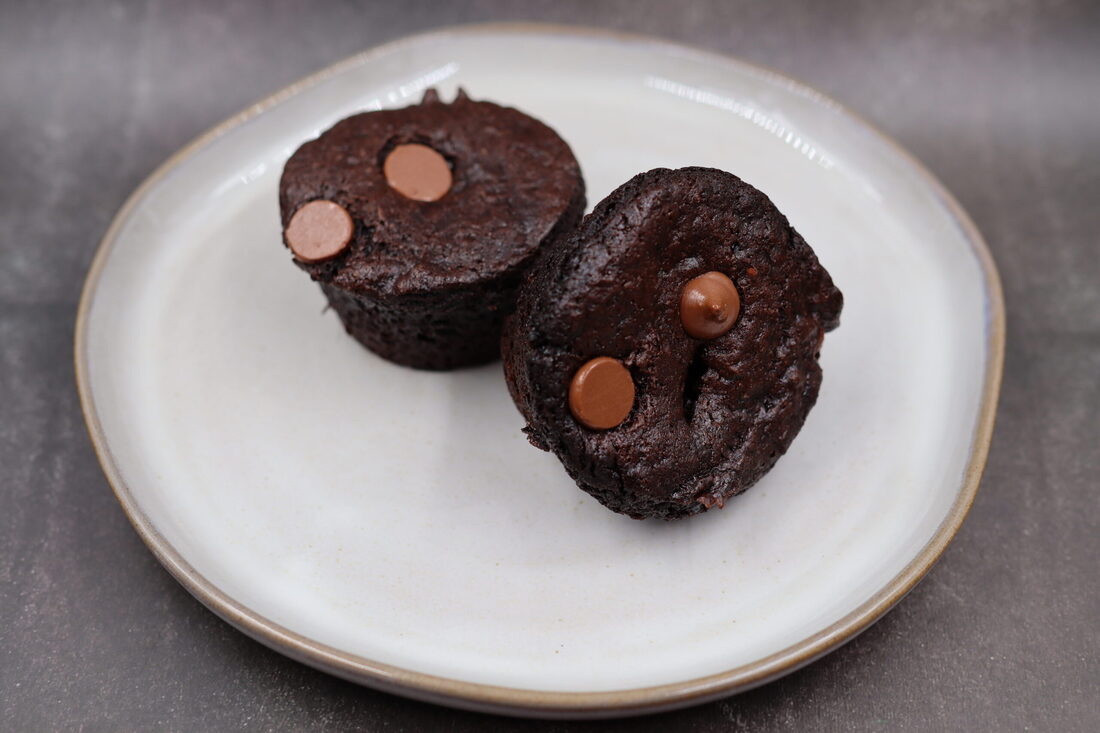 These double chocolate banana muffins are the answer to overripe bananas! If you have a bunch of bags of frozen bananas in your freezer these are the perfect recipe to use them up! I always seem to have bananas on hand that ripen too fast… or we eat them too slow… however you want to look at that! There are other variations of this recipe you could make as well. If you don’t want double chocolate, use a vanilla cake mix and add nuts or chocolate chips. Create your custom muffin with your imagination! What Do I Need To Make These Double Chocolate Banana Muffins? You will need 4 overripe bananas….. I like to freeze them first so they smush easier, but you can use fresh ones too. One gluten free chocolate cake mix. 1 Cup of Gluten free chocolate chips. 1 TSP Vanilla. A little water if the mix is too dry… Start with 1 TBSP. 1 TSP Cinnamon. 1/8 TSP Cayenne Pepper. More if you like it spicy! That’s it! Very few ingredients. Super Easy! Add all of the ingredients to a bowl and mix it up! Bake at 350 degrees for about 30 minutes, or until a knife comes out clean. Store in the fridge. Why I Like Frozen Overripe Bananas:I like using frozen overripe, peeled bananas because they produce a little more syrupy liquid when they are thawed and I think it makes the banana muffins or banana bread more delicious! Here’s how I like to mash my bananas: Peel them and put them in a ziplock bag. Freeze them. When you are ready to make these double chocolate banana muffins, thaw them. When they are thawed, smoosh them between your fingers! Boom-smashed bananas! When I was making this recipe I was thinking of my girls who are both in college. They have limited storage in their kitchen, so it would be easier to make muffins out of a cake mix rather than have baking powder, gluten-free flour, sugar, etc. Plus this makes it super easy! The added chocolate chips are because of them too! Haha! Pin These Chocolate Banana Muffins Now Make Them Later! 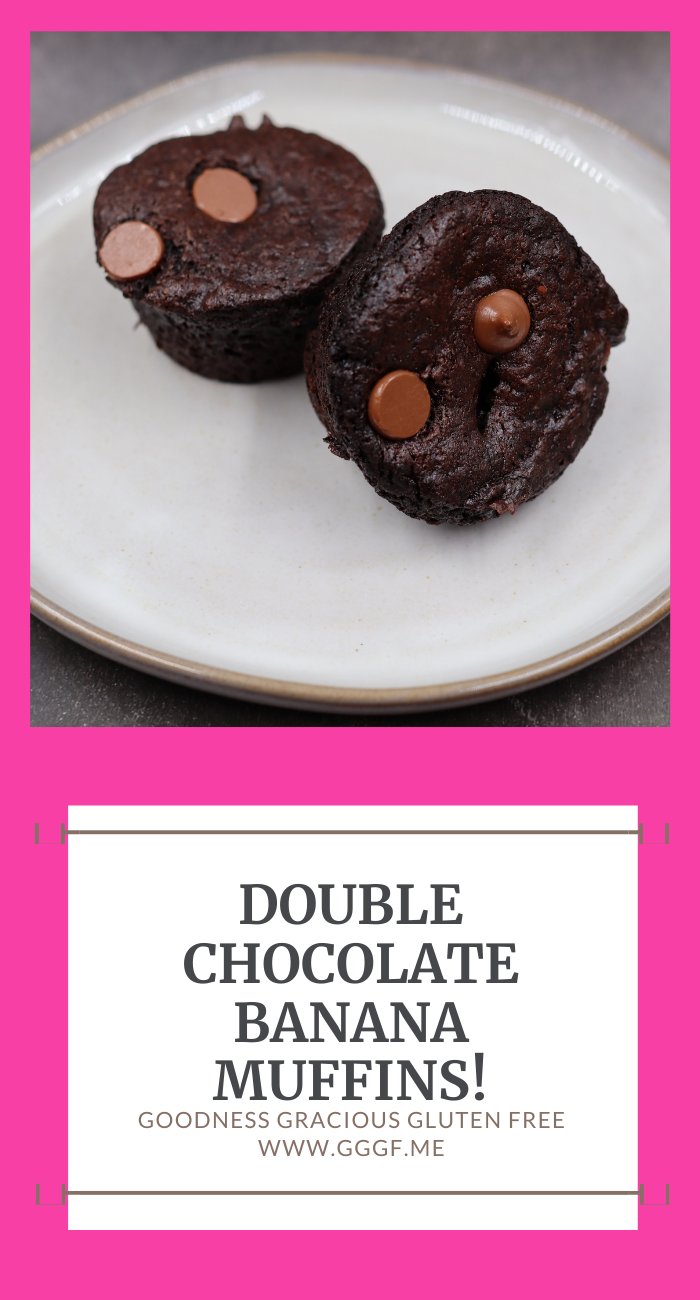 If you like these gluten free double chocolate banana muffins you might also like: Gluten Free Breakfast Pizza Gluten Free Breakfast Egg Roll Ups I made these live on Instagram and Facebook, in case you want to watch me make them so you can see truly how easy they are to make! I am excited to see what variations you make with this recipe! Comment back to let me know! Here is the Video: Now on to the printed recipe… These ingredients are awesome to keep on hand in case of last-minute guests or you are hankering for a delicious, moist (even though I really don’t like that word) chocolate treat!
Double Chocolate Banana Muffins Use up your overripe bananas in this super simple recipe! INGREDIENTS
INSTRUCTIONS
I hope you enjoy these Double Chocolate Banana Muffins! As Always, Best Wishes for Gluten Free Dishes! XO, Michelle Super Easy and fun to make with kids for a snack! These delicious gluten free apple nachos can be topped with your favorite topping for a delicious snack! 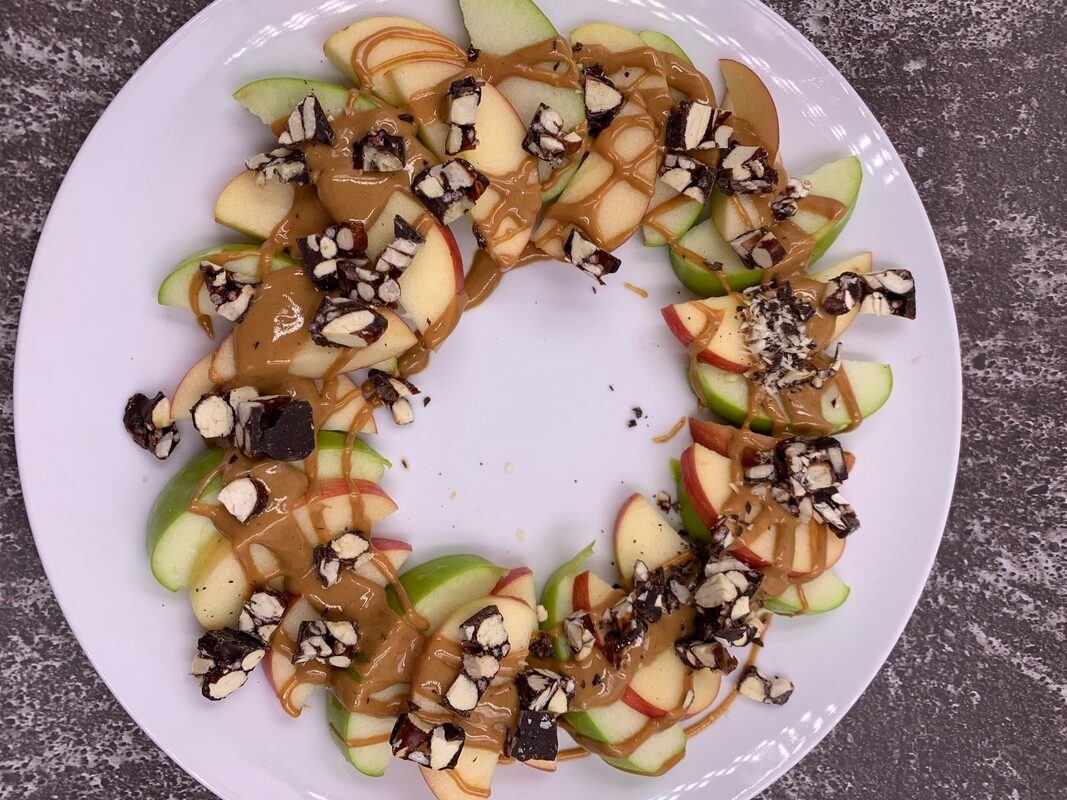 Are you looking for a healthy kid-friendly snack? Try my Delicious Apple Nachos! This is one of my girls’ favorite snacks from when they were little. Actually, they still like it now that they are adults! Who wouldn’t? It is super easy to make and you can use the ingredients you have on hand. This version of my apple nachos has melted peanut butter and chopped-up kind bar on top. The toppings are up to your imagination! Apple Nachos Topping Ideas: Some of our favorite toppings are: chocolate chips granola chocolate sauce nut butter sunflower butter marshmallows chopped up protein bar chopped up kind bars nuts sunflower seeds caramel sauce popcorn Blueberries Holiday candy The possibilities are endless! You can combine as many or as little as you would like. Pin This Make it later! 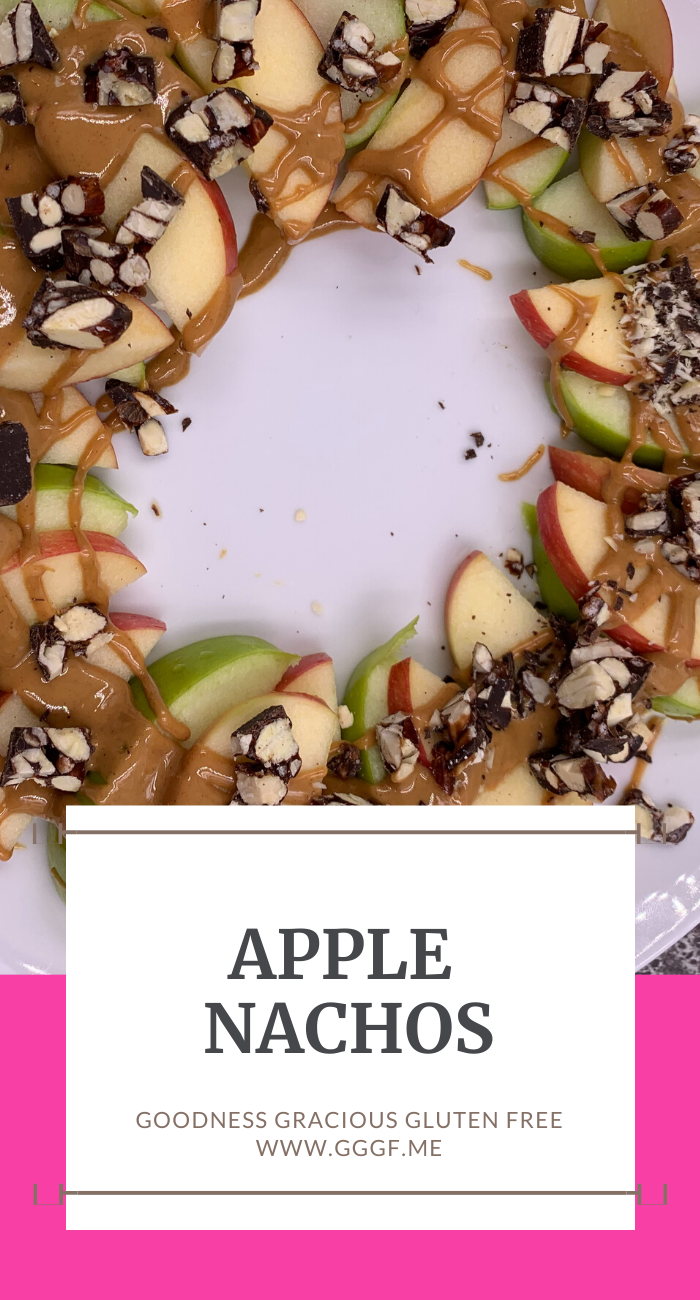 If you are looking for other snack ideas here are some you might like: BLT Sandwich Skewers Cranberry Goat Cheese Stuffed Dates Do you need any tools to make these delicious apple nachos? If you need an apple chopper, check out the one I found on Amazon! If you order through the link on my page, I will get a small proceed from Amazon. It doesn’t affect the price of your item it just helps me out Here are my policies and disclosures. Are you a snacker or meal eater? What kind of food spacer are you? Do you only eat three meals a day and that is it? Or do you eat many smaller meals a day? My oldest daughter is a snacker. She has been home for a few weeks and I am quickly reminded that she loves snacks! She can be found with little bits of food while she is working on college homework or doing her online classes. However, she is awesome at making them herself! My younger daughter is not really a snacker like her sister. She eats usually at mealtime and that’s it. Not that she never eats popcorn if we have movie night but as usual, she’s not a big snacker. I am not giving an opinion on which is better just was curious about it :) Here’s The Video of how to make Apple Nachos: Here’s The Recipe:
Apple NachosQuick and easy snack to make that is healthy and gluten-free! SERVINGS 3 INGREDIENTS
INSTRUCTIONS
As Always, Best Wishes for Gluten Free Dishes! XO, Michelle Gluten-Free Philly Cheesesteak Stuffed Potatoes are a delicious appetizer! They are fun to make and are not too labor-intensive! You can make them using mini potatoes like I did or make them with larger potatoes and have them as a meal. Either way, they are delicious! September is here and September brings Fall! I am very excited about cooler weather and all things pumpkin! (Spoiler alert… pumpkin recipes are on the way) Today’s recipe is one I made to take to a BBQ this weekend. It would also be a great recipe for tailgating since football has started. It is definitely a crowd pleaser! 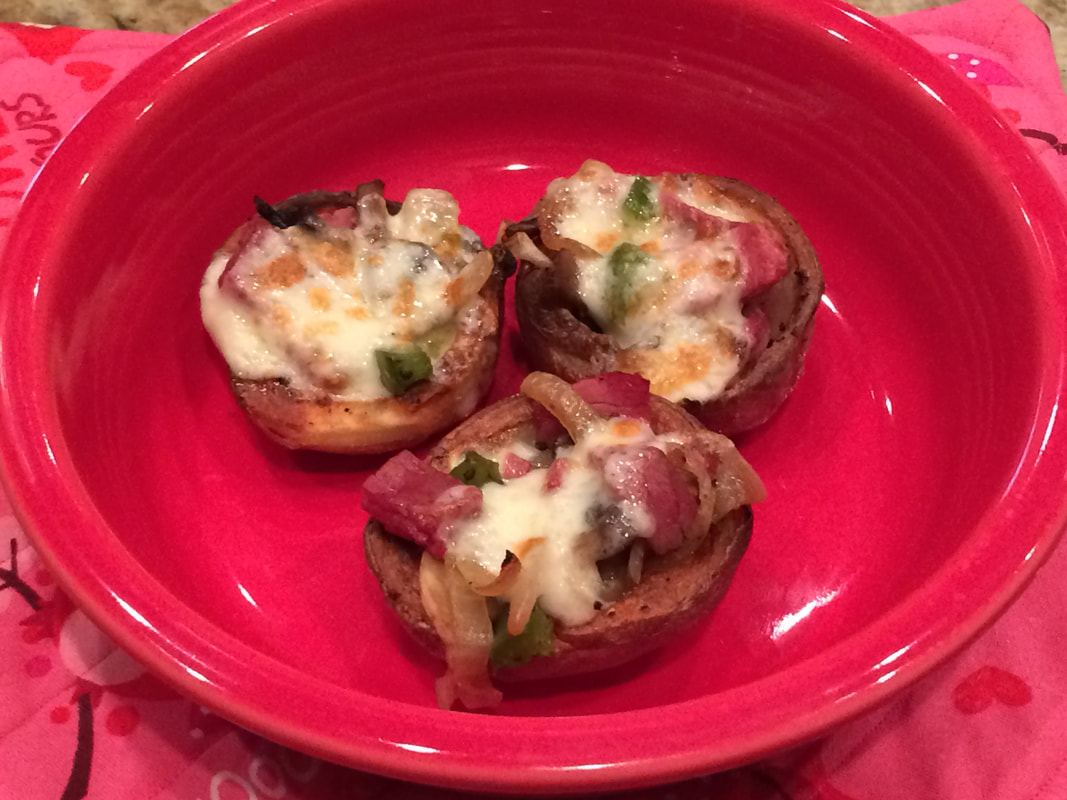 Original Post was written 09/02/2014 and updated 1/24/22 WHAT DO I NEED TO MAKE PHILLY CHEESESTEAK STUFFED POTATOES? To make this recipe you will need the following ingredients: Green Peppers Yellow Onions Mushrooms Pastrami Sliced Provolone Cheese Potatoes- I used mini potatoes for appetizers but you could use big potatoes for lunch or dinner. HOW DO I MAKE THEM? The first step is to chop all of the veggies and the pastrami into small pieces so they are easy to stuff into the potato. The next step is to sauté all of the veggies and then add in the pastrami. 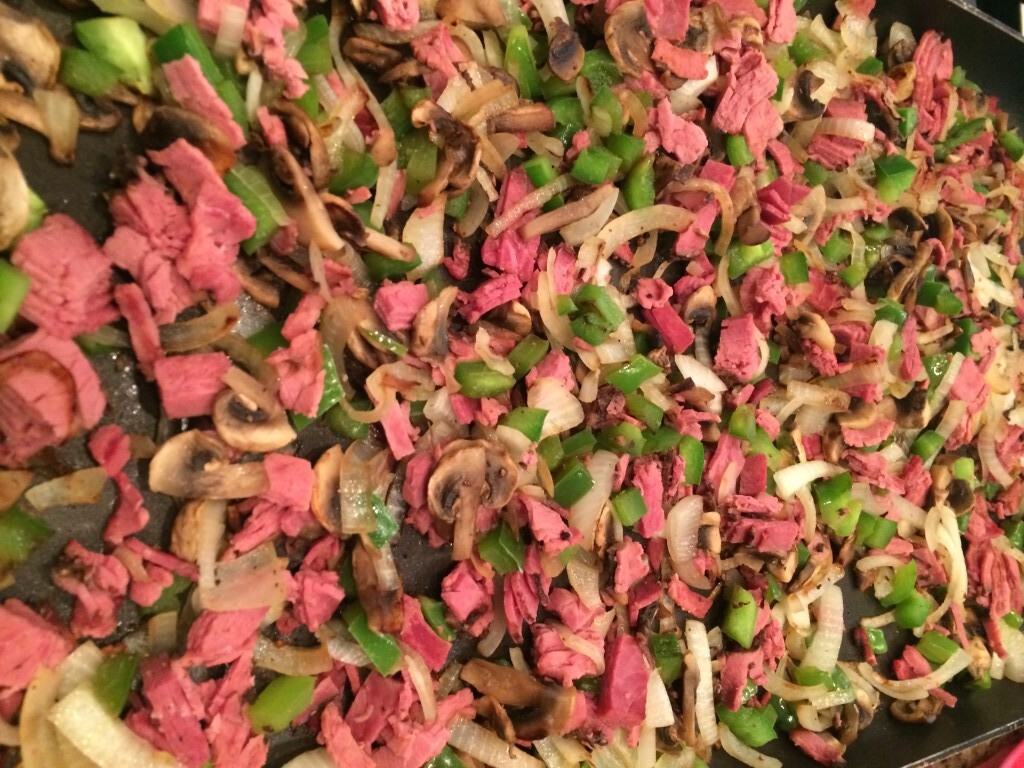 Bake the potatoes, either in the microwave or oven. Cut them in half then scoop out the middle. Save the middle for hash browns tomorrow :) Drizzle the potatoes with oil and broil them in the oven to make them crispy. Lay a small piece of sliced provolone cheese in the bottom of each potato. 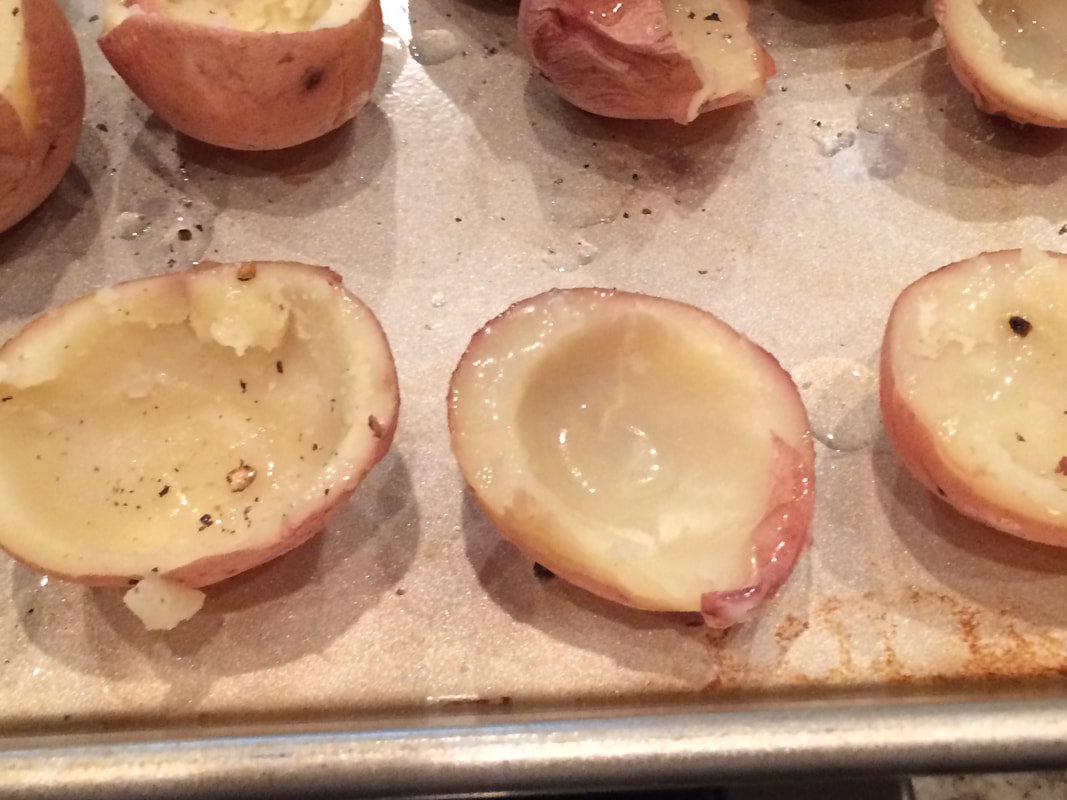 Put the toppings into the potatoes and put another slice of provolone cheese on top. Put them in the oven to melt the cheese. When it’s brown and bubbly, they are ready to eat! 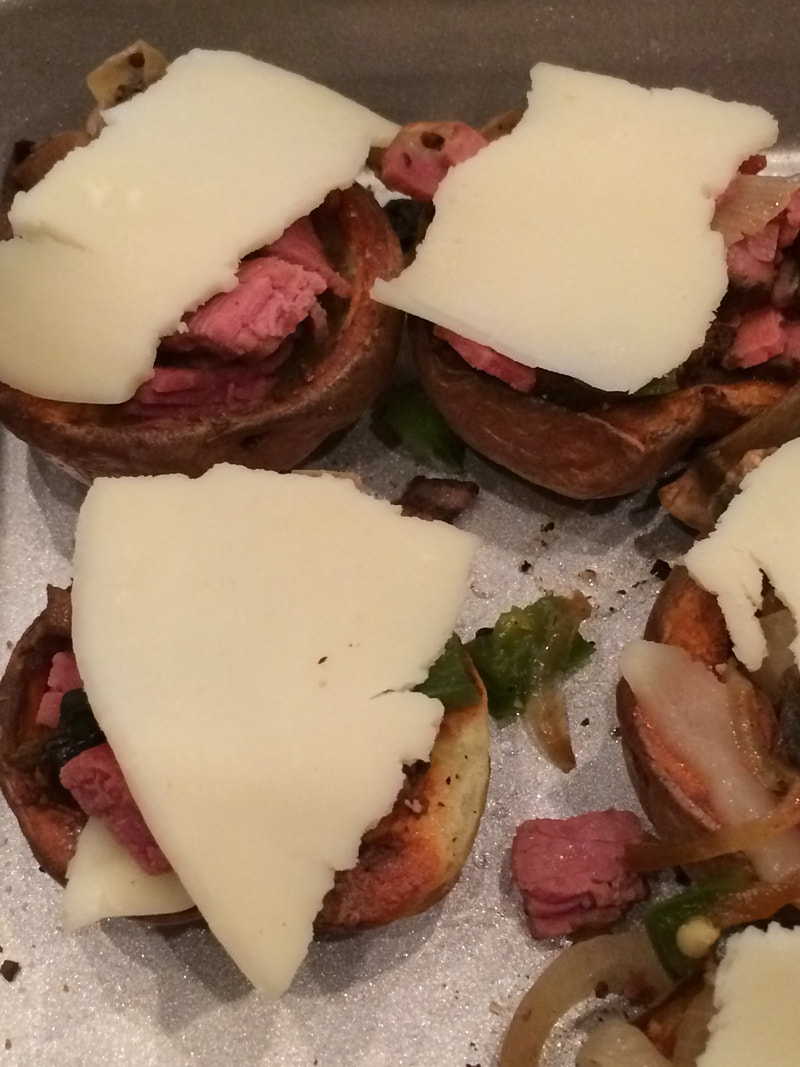 IF YOU LIKE THIS APPETIZER, HERE ARE SOME OTHER ONES YOU MIGHT LIKE: Buffalo Chicken Dip is one of my favorite appetizers! It is super easy to make and it feeds a group of people easily! My Thai Chicken Lettuce Wraps are beautiful and full of flavor! You should give them a try! Easy Stuffed Jalapeno Peppers are another crowd favorite! They are super easy to make and full of cheesy deliciousness! Pin me NOW make me LATER! 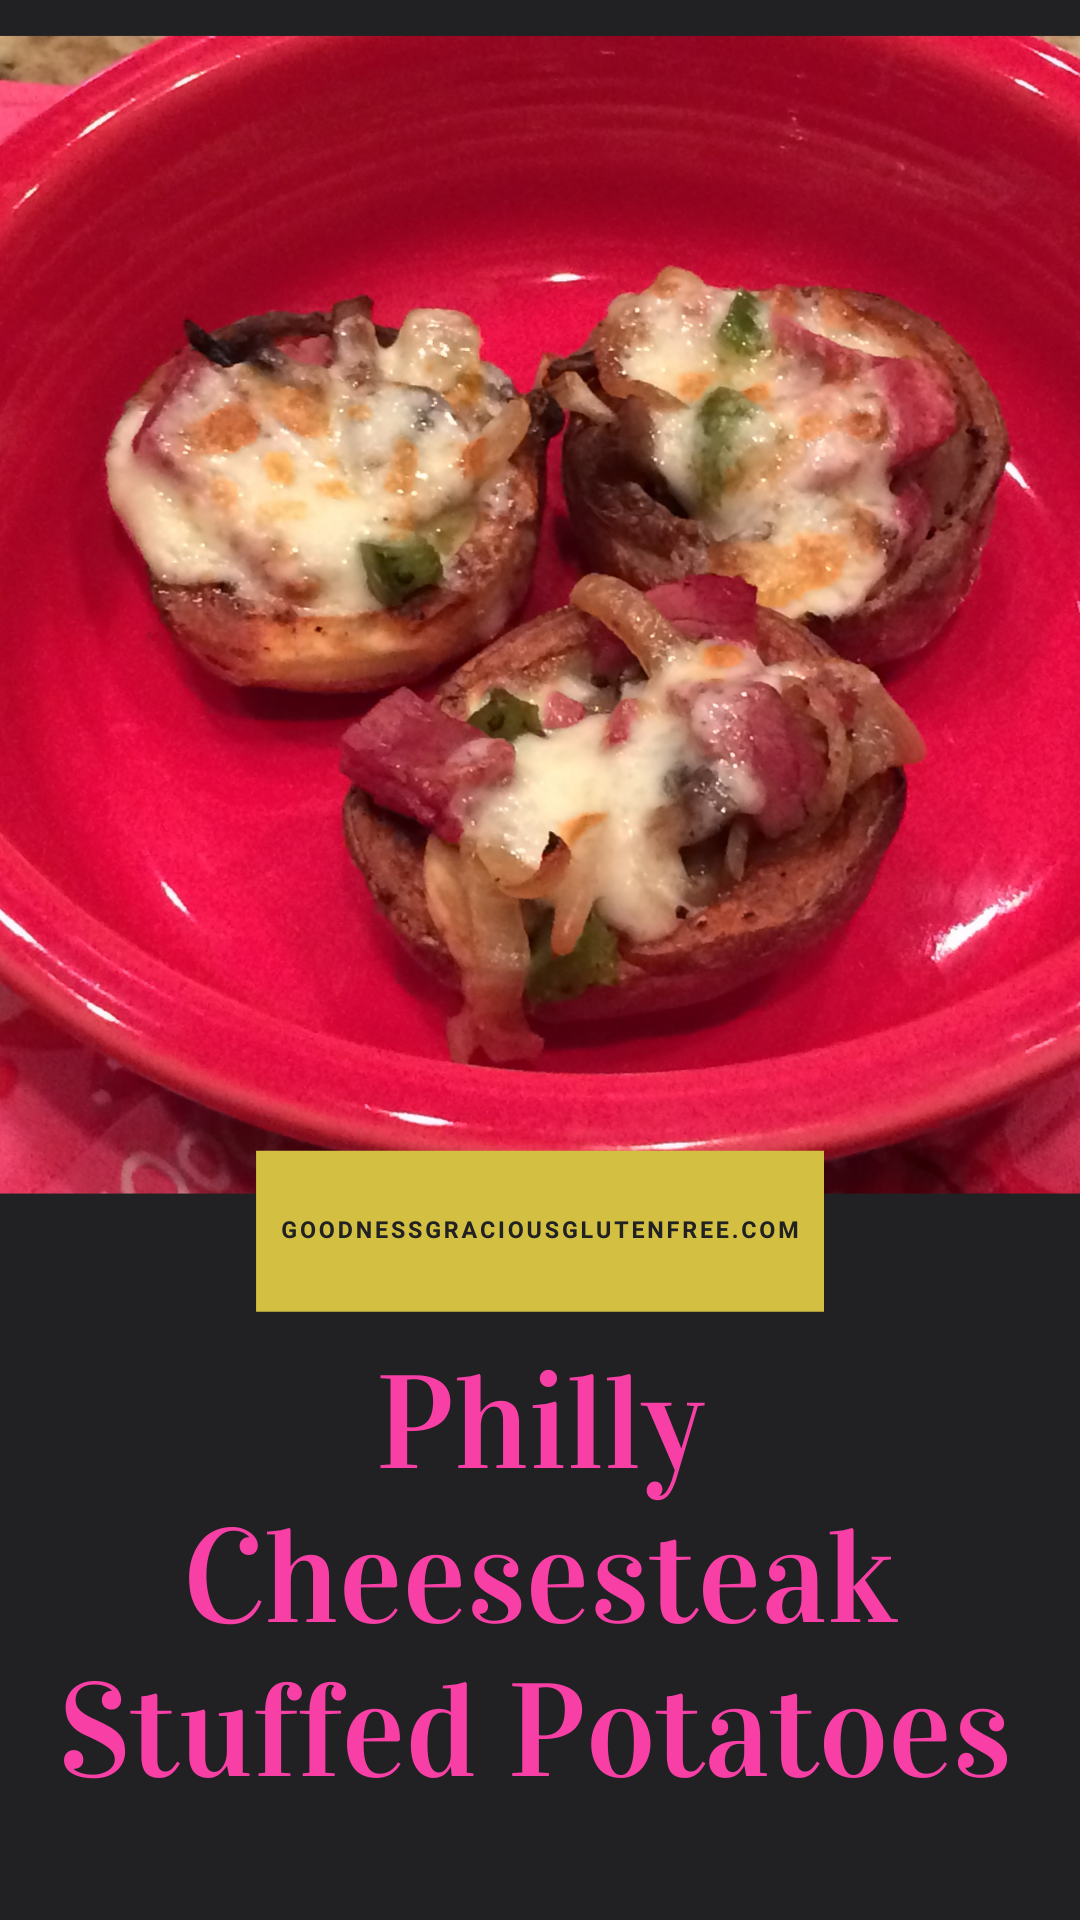 Here's the recipe! INGREDIENTS
I hope you enjoy this gluten free Philly Cheesesteak stuffed potato recipe! As Always, Best Wishes for Gluten Free Dishes! XO, Michelle |

Hey There!I am so glad you are here! Categories
All
Archives
June 2023
|


 RSS Feed
Click to upload Footer Background below