|
These Caribbean Chicken Wraps are the perfect summer food or for any time of the year you want to pretend you are in the blue tropical waters of the Caribbean! 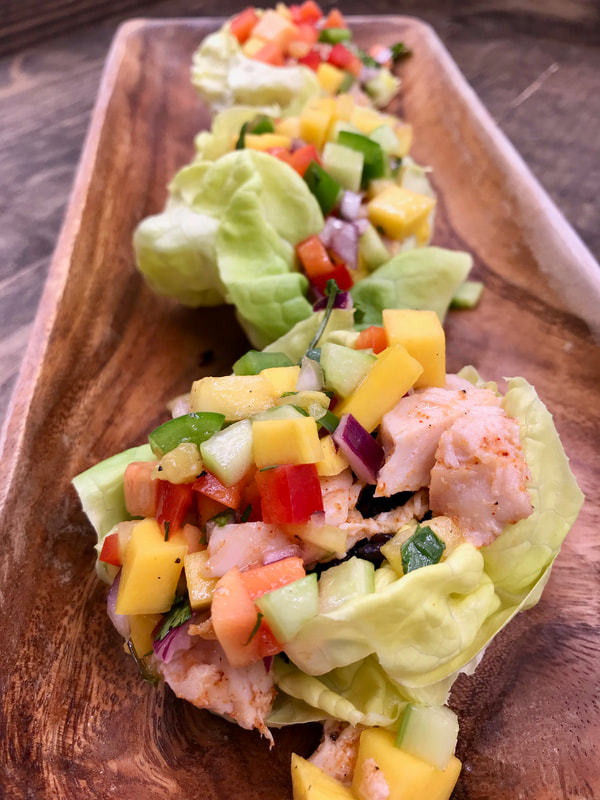 I love the beautiful colors and the fresh taste of this recipe! You can spice it up by adding a spicy pepper in it if you like or more jerk seasoning. It is a very simple recipe to make as long as you are ok with chopping fruit and veggies into small pieces! I even made it easier by using organic rotisserie chicken! Leave the heat of cooking for the store. Other Variations of This Recipe: If you don’t eat chicken or just feel like switching it up, you could make this recipe with baked Mahi Mahi. You could even throw the Mahi and Caribbean Salad into a Soy Paper wrapper and have cooked sushi! These wraps are really pretty and would be a perfect party appetizer! Plus the zing and flavor would pair well with delicious light white wine! Now I want to plan a party and serve these! Who’s in? Here are a few cute items to serve these on: What You Need to Make These Caribbean Chicken Wraps: 1-2 Mangoes depending on the size A Pineapple Papaya 2 Peppers- 1 Green and 1 Red or Orange pepper A Red Onion A Cucumber 1 Bunch of Cilantro A Jalapeno if desired 1 TSP Jerk Seasoning (I used Flavor God) 2 Cups Rotisserie Chicken Meat cubed 1/4 Cup Jalapeno Olive Oil- or regular Olive or Avocado oil 1/4 Cup Jalapeno Balsamic Vinegar 1-2 Heads of Butter Lettuce Pin Now Save For Later! 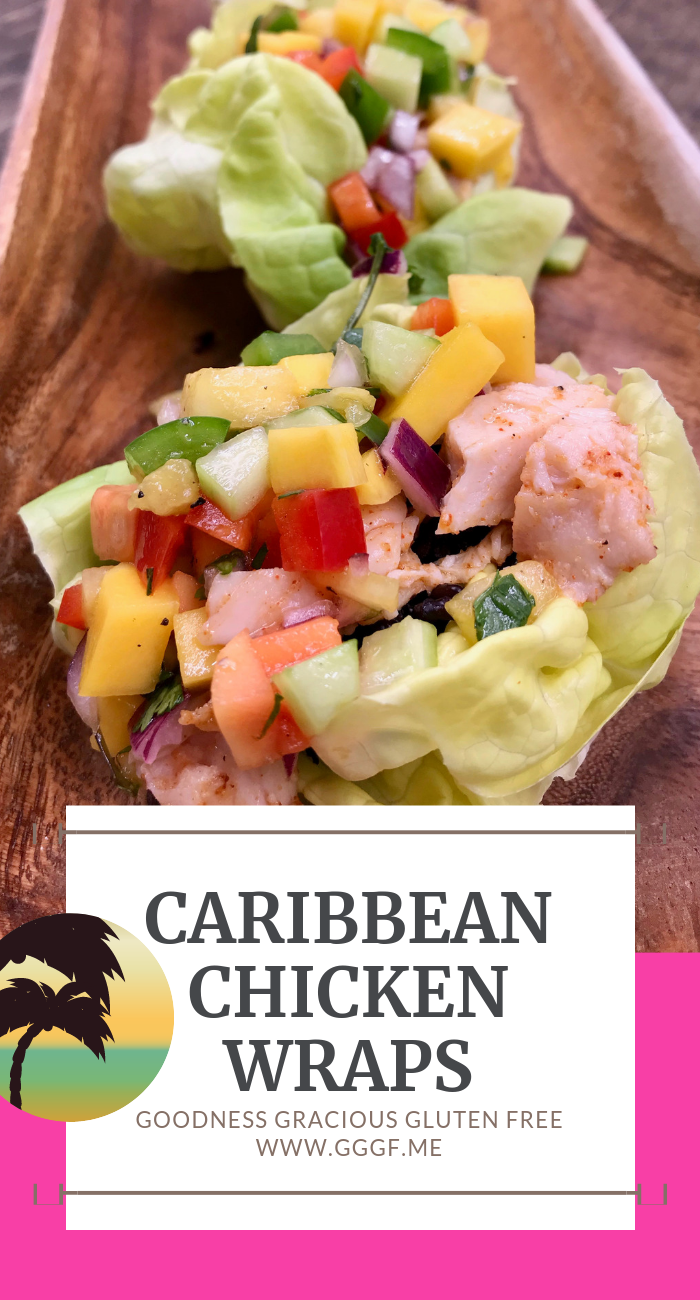 Here Are Some Other Recipes You Might Like:Yummy Gluten Free Thai Chicken Lettuce Wraps Gluten free bacon braised cabbage Gluten free Jamaican Jerk Tri Tip Here’s The Recipe:Caribbean Chicken WrapsTropical chicken lettuce wraps are fast and delicious to make! INGREDIENTS
INSTRUCTIONS
I hope you enjoy this recipe! This recipe makes me wish we were back in St. Martin on the catamaran with the breeze blowing in my hair! We went with Tradewinds on this trip!  As Always,
Best Wishes for Gluten Free Dishes! XO, Michelle
0 Comments
Gluten Free Sausage Stuffed Mushrooms are a fantastic appetizer, lunch, dinner or brunch food! We love to top them with a poached egg for brunch! 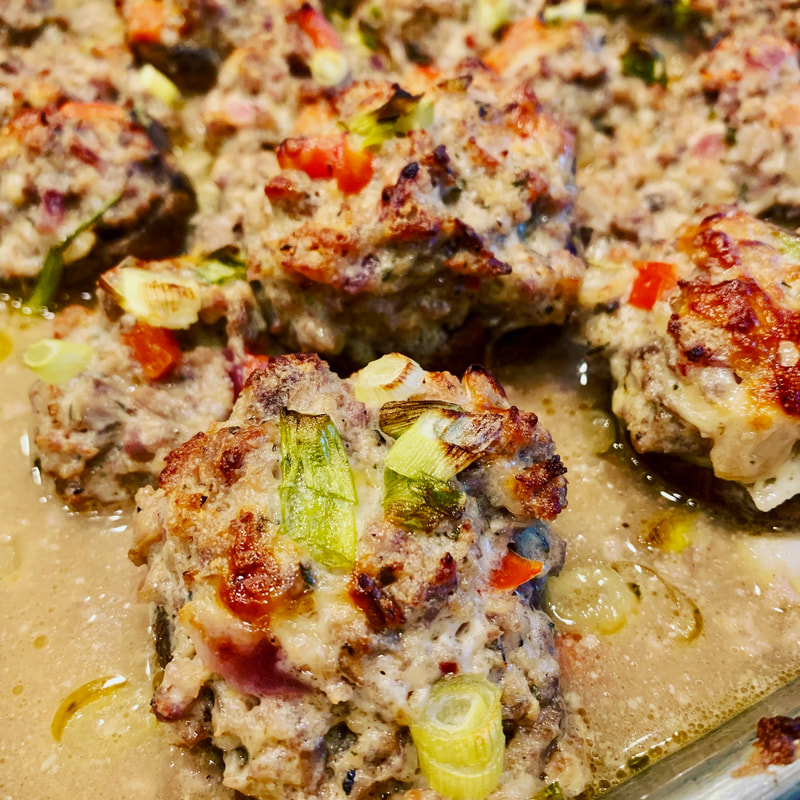 Are you looking for a delicious appetizer? How about a quick dinner? These keto sausage stuffed mushrooms are both! They won’t leave you feeling left out at a party either with the delicious creamy texture and protein to boot! They are easy to put together which is a bonus! The minute I put these babies on the menu my family gets super excited! My hubby even eats them for breakfast the day after! I have another recipe on my blog for Crab stuffed mushrooms you might also like if you wanted to mix and match your stuffed mushrooms. Here’s What You Need To Make These Sausage Stuffed Mushrooms: The great news is the ingredients are everyday items! There isn’t anything exotic in them! You will need the following: 2 lbs of Ground Pork Sausage- I used a gluten free breakfast blend. 1 red pepper A sweet yellow onion 1 red onion A clove of garlic 1 Large package of mushrooms. I mixed white mushrooms and baby portabella mushrooms. 1- 8 oz Pkg raw cheddar cheese shredded- you could use regular shredded cheddar too. 1- 8 oz pkg cream cheese- softened. 1/2 cup White Wine or Rose to put in the pan before baking to steam the mushrooms. 2 green onions- chopped to garnish the tops for added color. THE STEPS: Wash and dry the mushrooms. Remove the stems. Chop the stems into small pieces. In a pan over medium heat, drizzle a little olive or avocado oil and saute the chopped onions, red pepper, and the chopped stems of the cleaned mushrooms. Add the garlic and continue to saute. If your pan is large enough add the pork sausage and continue to saute. If your pan is not large, remove the veggies and cook the pork sausage separately. Add the veggies back once the pork is cooked. Stir to combine. Add the package of cream cheese and stir to combine. Add the shredded cheddar and stir to combine. Turn the heat off in the pan. Place the mushroom caps in a baking dish. Scoop the filling into the caps. Continue until all the filling is in the caps. Pour the wine into the bottom of the pan and cover with foil. Bake in a 350-degree oven for 15-20 minutes until the mushrooms are soft but not soggy. Remove the foil and broil the mushrooms for a few minutes to crisp up the tops. Now it’s time to serve them! And Eat them! Wahoo! Pin Now Make Me Later! 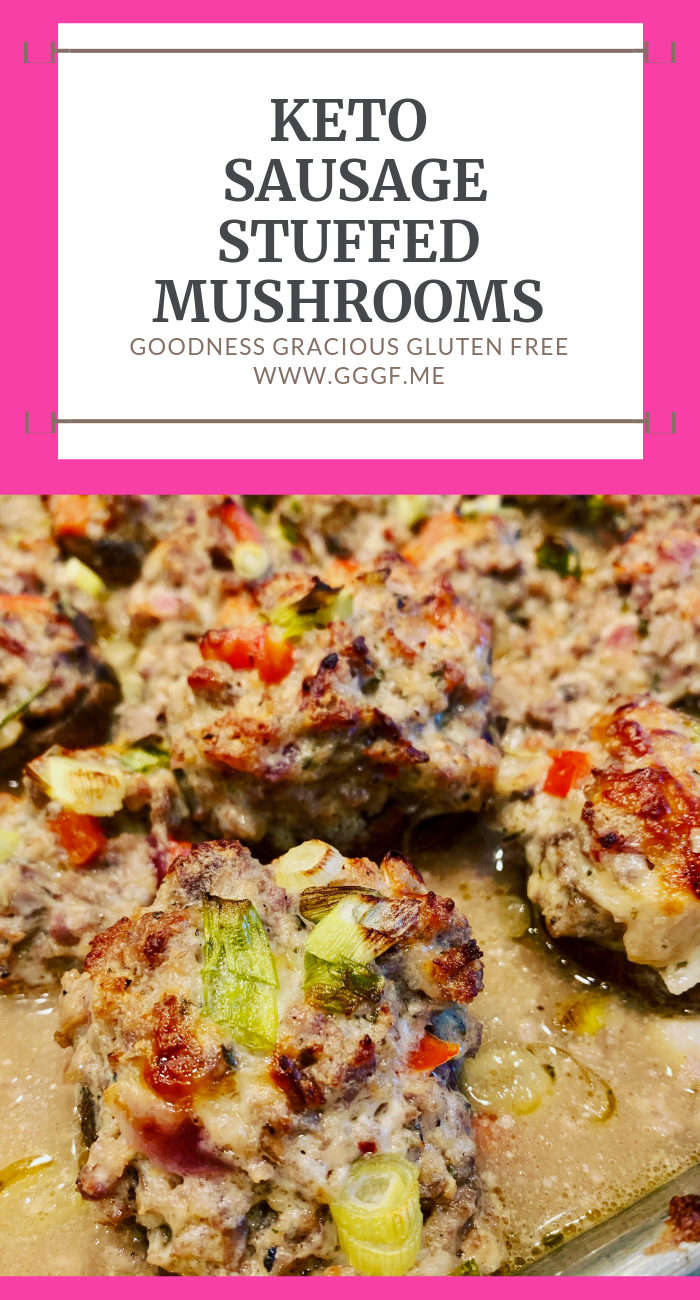 Keto Sausage Stuffed Mushrooms
Creamy and delicious keto stuffed mushrooms! PREP TIME 15 mins COOK TIME 20 mins INGREDIENTS
INSTRUCTIONS
As Always, Best Wishes for Gluten Free Dishes! XO, Michelle My friend Roxy shared her Mom's Famous Enchilada recipe with me and I am sharing it with you! They are so delicious.. good luck eating just one! 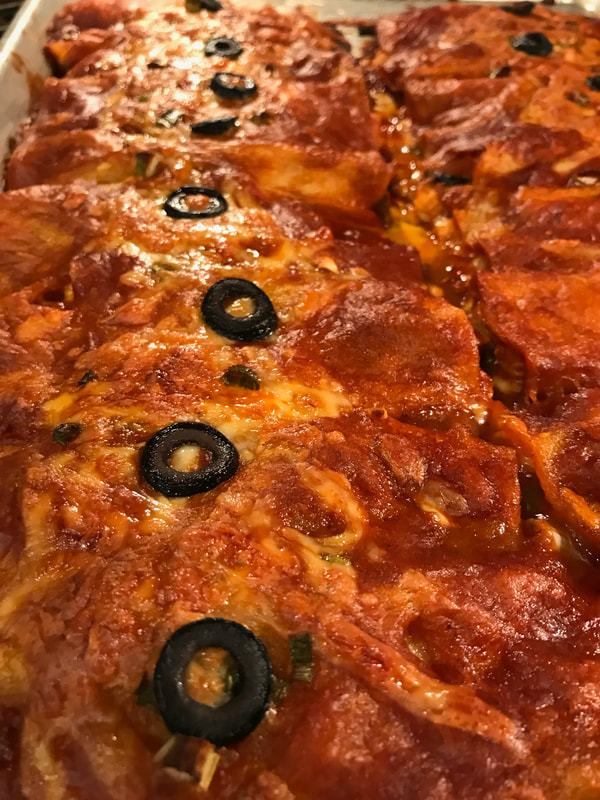 Who doesn’t want a delicious pan of saucy and crispy-edged enchiladas for dinner? These cheesy red chili sauce enchiladas are the perfect weeknight meal or add beans and rice and it’s a perfect weekend meal! My friend Roxy told me about her Mom Toni’s enchiladas and I was so excited to make them only in a gluten free version. We got together one Friday night with our friend Aimee and whipped these delicious morsels up! It was truly a team effort and I loved doing it. What Do You Need to Make These Enchiladas? To make these famous enchiladas you will need a few ingredients: 1 can Las Palmas Red Chili Sauce 1/4 Cup of Cornstarch 3 cloves of fresh garlic minced 1/4 Cup of Oil- I used Avocado 1 TSP Cumin 1/2 Can Water (about 1 cup) 5-6 Green Onions chopped 1 Pkg Monterrey Jack Cheese- Shredded 2 Small Cans of sliced Black Olives 2 Dozen Guerrero Corn Tortillas (or any gluten free version you like) Oil to fry the Tortillas- once again I used Avocado 1 Rotisserie Chicken Shredded Plus any other toppings you would like to add Such as sour cream, etc. I personally don’t think they need anything else at all! Besides a fork…hehe. How Do I Make These Delicious Enchiladas? These famous Enchiladas are really easy to make with just a few easy steps. To begin, I make a little tin foil pocket to put the tortillas in once they are fried to keep them warm. Heat a skillet over medium heat and drizzle with a little oil. Toast your tortillas on each side. Place them into the pocket to keep warm. Mix together in a bowl the cheese, green onions, olives, and 1/2 of the garlic In another pan, heat 1/4 cup of oil and make a rue with the cornstarch. Cook it for a few minutes to thicken. Stir in the red chili sauce and combine to make it thick. Add the water until it is a nice consistency. It should be like a chowder consistency, not play-dough. If it is too thick add more water to thin it out. Add the rest of the garlic. Stir. NOW FOR THE FUN PART! It’s time to assemble your delicious enchiladas! Bake them and then the best part! EAT them! Step one- take a fried tortilla and dip it into the sauce and coat it well on both sides. Place it on a plate and put some chicken and cheese mixture inside. Roll it up and put it seam side down on a baking sheet. We used a cookie sheet. Continue until all of your tortillas are used. Spoon a little more sauce on top of each enchilada. Top with additional cheese and an olive. To make it look pretty. Bake in a 375 degree oven for 10-15 minutes or until the cheese is melted and the edges are a little crispy on the tortillas. Eat them how they are or serve with rice and beans! Aren’t They The Cutest?  I am super thankful for both of these ladies sharing their recipes with me! I loved making them! Here Are Some Other Recipes You Might Like: My Almost Famous Refried Beans Texas Caviar Holy Guacamole Pin THIS NOW Make It Later! 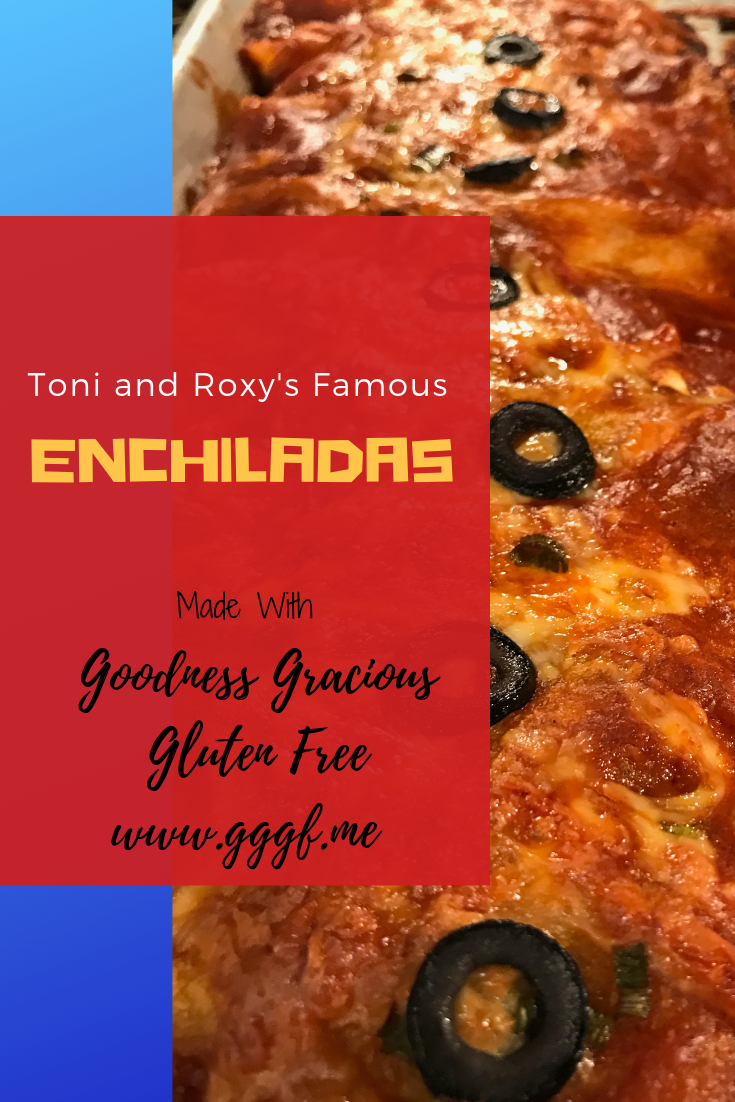 Here’s The Video of Us Making This Recipe: Here’s The Recipe for Toni and Roxy’s Famous Enchiladas!
Toni and Roxy’s Famous Enchiladas Delicious sheet pan enchiladas that are perfect for any night of the week! INGREDIENTS
INSTRUCTIONS
As Always, Best Wishes for Gluten Free Dishes! XO, Michelle Gluten Free Bobotie is a flavorful South African Dish that pairs well with fruit chutney! So many spices and it's delicious! 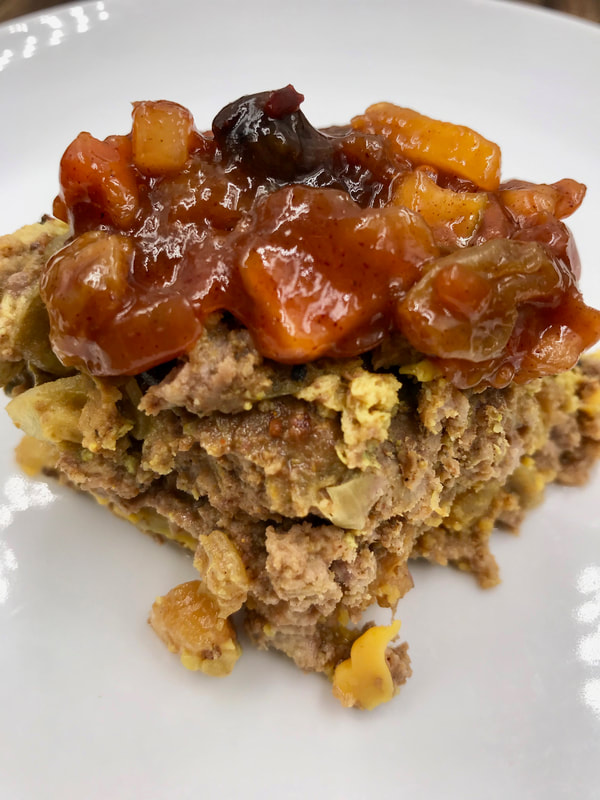 What is Bobotie????? Bobotie is a South African meatloaf that is filled with delicious spices and topped with an awesome Fruit Chutney! I linked the recipe to my fruit chutney so it would be easy to find. We had this dish when we were sailing in Saint Martin with Trade-winds. Manu, our first mate made this delicious dish for lunch one day and I asked her how to make it. So, this is my version of how she made it. Thank you, Manu for the exposure to this dish and new food! Here’s A Video to Show You How to Make Bobotie: What Kind Of Meat Can I Use In Bobotie? I have read online that it can be made from beef, pork or lamb or a combination of those meats. I made mine out of beef, but I think we would have loved it with lamb. However, our guests don’t love lamb as much as we do so I made it with beef. I absolutely love the smell of lamb cooking and can picture the scent in my head with all of the spices and chutney added! Next time I am making it with lamb for sure! What Do I Need To Make This Recipe? You will need a 9 x 13 Pyrex rectangle baking dish to make this Bobotie. Also some fragrant spices and herbs. Here’s the list: 4 pieces of gluten free bread 3 lbs of ground beef 2 yellow onions 1 TBSP butter 4 cloves of garlic 4 TBSP Curry Paste 1 Cup Chutney 1/4 Tsp Red Pepper Flakes or more if you like it spicy. 4 Bay Leaves 1 TSP of the following: Allspice, Cumin, Paprika, Smoked Paprika, Curry, Tumeric, 21 herb seasoning, Ginger, Cloves, Nutmeg (I used Pumpkin Pie Spice) 2 eggs 1 Cup Cream This recipe goes together very quickly and is an easy meal. The whole house smells wonderful when it is cooking. Pin This NOW and Make it LATER! 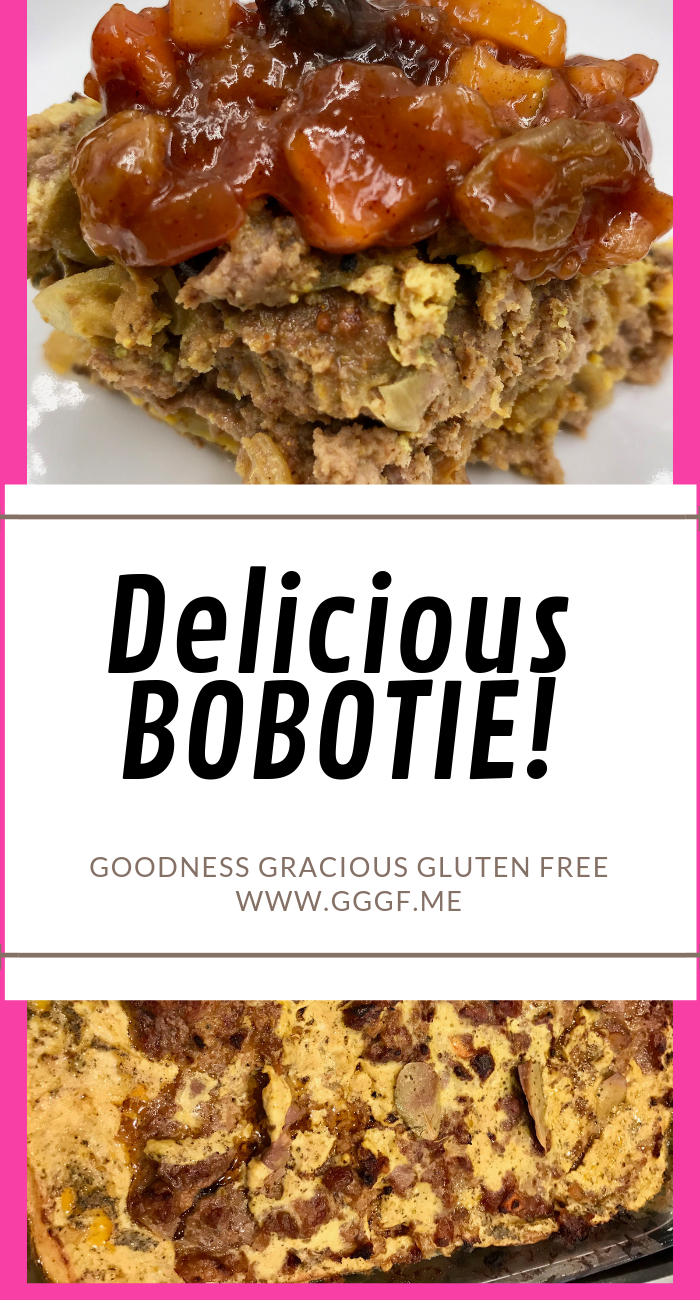 Here’s The Printable Recipe:
Bobotie: This is a delicious South African Meatloaf filled with warm spices and beautiful flavors. INGREDIENTS
INSTRUCTIONS
Here’s The Chutney Recipe Fruit Chutney for Bobotie! I hope you love this Bobotie Recipe! As Always, Best Wishes for Gluten Free Dishes! XO, Michelle These easy gluten free tuna melts remind me of my Mom. She would make these and I wanted to recreate them gluten free!  This easy tuna melt is a great idea for a quick meal. I love them when we are on the go and need something quick for lunch or dinner. Or if we are having a lazy movie day and don’t fell like cooking something fancy. What are your quick meals for busy days or lazy days?I have an arsenal of quick meals in my back pocket for days just like this one. It is raining and cold here in usually sunny AZ. We have had more rainy days this winter/spring than I can remember in over 20 years of living here! The clouds and cool weather make me want to snuggle up on the couch with a good book or a good movie. I wish it was the weekend so my hubby could be in that equation but it’s not so my furry friend will have to fill in. She loves to snuggle so is a great substitute! Here are some other quick meals you might like if you like my easy tuna melt: Thai Chicken Lettuce Wraps BLT Sandwich Skewers Honey Garlic Thighs made in the crockpot Did You Grow Up Eating Tuna Melts? Easy tuna melts were my Mom’s OG recipe. OG (original gangster) makes me laugh especially when referred to my Mom since she wasn’t really a gangster at all! But she was an OG about cooking. I learned to cook a lot of things from my Mom and my love for feeding people and making homemade food definitely came from her. I can still remember her making homemade buns on cool days. They were so delicious!  Now, I wouldn’t be able to eat any of the items pictured! Looking back I probably shouldn’t have been eating them then, but we didn’t know.
Melty open faced sandwiches were a favorite around our house. My Mom liked to buy salmon with the bones in it and it would crunch when you ate it…barf.. but I much preferred the tuna. No bones and the only crunch was from whatever you added to the tuna. Here’s What I Put in Our Easy Tuna Melts: To make this masterpiece of an easy meal, you will need the following ingredients: Gluten free Break- I used Canyon Gluten Free Bakehouse Mayo- I used Sir Kensington’s Tuna- I used albacore from Costco- the wild caught stuff that is supposed to be better for fish and sustainability. Celery Red Pepper Tomato Green onions Organic Sharp Cheddah- same as cheddar just better S & P or any other seasonings you like
Here’s The Printable Recipe: Easy Tuna Melt Gluten free tuna melts ready to eat in 10 minutes! Yes, please! INGREDIENTS
INSTRUCTIONS
As Always, Best Wishes for Gluten Free Dishes! XO, Michelle These gluten free BBQ Pressure Cooker Ribs are super delicious and fall off the bone! The Instant Pot makes them easy for a weeknight dinner! 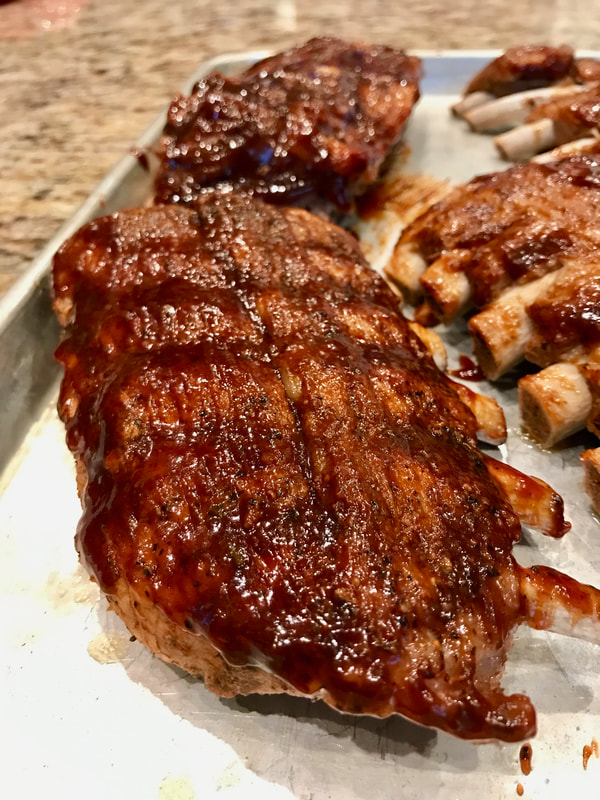 Gluten Free BBQ Pressure cooker or Instant Pot ribs are a quick weeknight meal! Did you get a pressure cooker or an Instant Pot this year? Are you looking for a fast and delicious meal for your family? I made these quick and easy pressure cooker ribs in less than 45 minutes! It was one of those days when I couldn’t decide what to make for dinner. I have that problem too occasionally just like everyone else. It was a lazy rainy day here and we had company in town. I couldn’t decide what I wanted to make for dinner. Should we go out to eat? What should we have? Finally, at about 3 p.m. it came to me Ribs! The only problem was they were in the freezer. So, I quickly took them out of the freezer and put them in a zip lock bag in a bowl full of cool water. I needed to thaw them a little so I could separate them. What do I Need to Make These Gluten Free BBQ Pressure Cooker Ribs? You will need a pressure cooker or an Instant Pot. Pork Baby Back Ribs BBQ sauce Dry Rub seasoning That’s it! Super easy! I finished the ribs in our smoker to add the smoky flavor and make the sauce sticky, but you could finish them in the oven. You really don’t want to cook them, just heat up the sauce. How Do I Make These Delicious Looking Ribs? So glad you asked! I would love to share that with you! To begin, remove the silver skin from your ribs. It’s kinda gross, but it makes a huge difference on how tender your ribs turn out! The best way I have found to remove it is to use a paper towel and grab it and pull. It should just pull off Here’s a YOUTUBE video on how to do it: Like I said it’s a little gross, but once you do it a few times it’s actually pretty easy. Rub your ribs with your favorite dry rub. I used Paleo Powder. Place your Ribs into your pressure cooker standing up so they curve around. You can cut them to fit. Add about 1/2 of a cup of water to the bottom of the pot. Put your lid on and turn the pressure cooker to manual pressure for 35 minutes. Now you have time to sit back and relax or make a side dish to go with the pressure cooker ribs. Once the pressure cooker is finished, CAREFULLY release the pressure. Open your lid and your ribs will be very tender. Carefully lift them onto a sheet pan and brush your favorite sauce on them. You can put them in a 350 degree oven for about 10 minutes to get the sauce sticky. I put mine in my smoker for about 15 minutes on 225 just to get the smokey taste and make the sauce sticky. They should be falling off of the bone and super yummy! I am seriously drooling right now typing this out. I might have to go heat some up…. hang on BRB. LOL. Pin Now Make Them LATER! 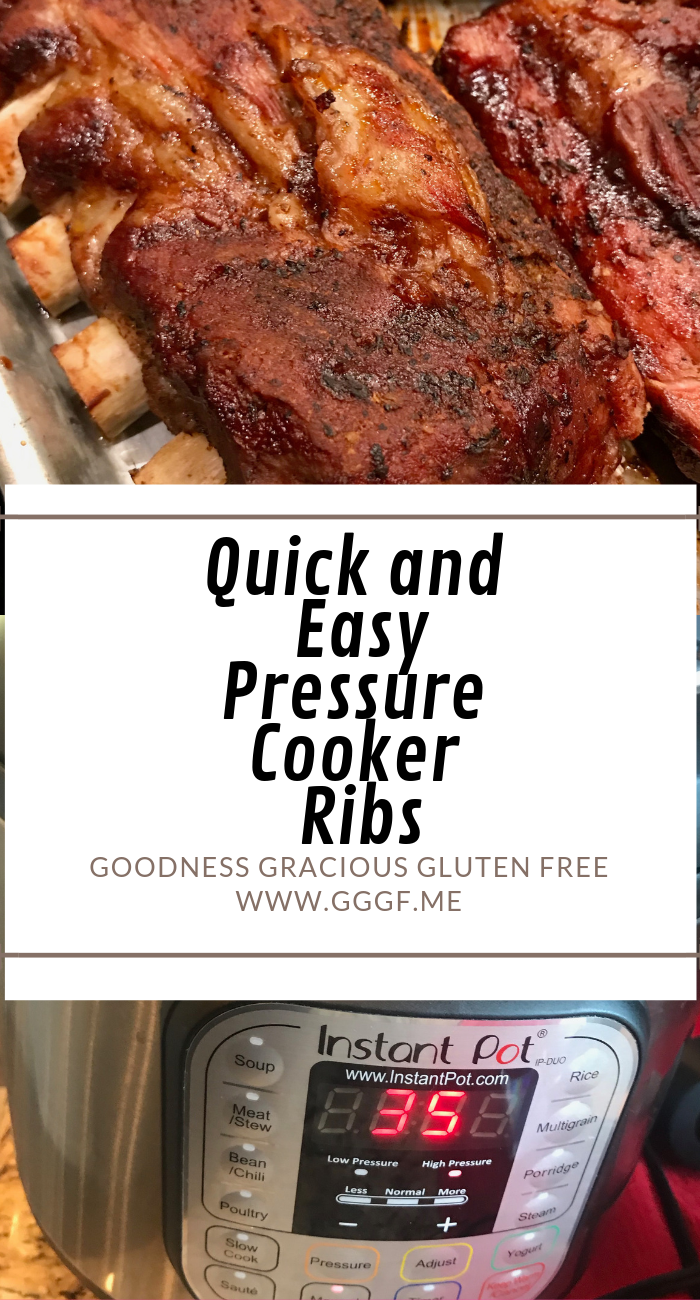 Here’s The Printable Recipe
Quick and Easy Pressure Cooker RibsRibs made in your Instant Pot or Pressure Cooker are fall off the bone delicious and make a weekend meal into a weeknight meal. On the table in 45 minutes! INGREDIENTS
INSTRUCTIONS
Hope you love these quick and easy pressure cooker ribs as much as we do! You might like to pair them with My Favorite Keto Wings and a nice glass of Gluten Free and Keto Wine! As Always, Best Wishes for Gluten Free Dishes! XO, Michelle This gluten free crunchy Thai Cabbage Salad is packed full of delicious peanut flavor and lots of crunchy veggies!  Why I Crave This Thai Cabbage Salad! This Thai cabbage salad is so easy to make and totally satisfies my craving for crunch! It is slightly salty and a little sweet so it is the perfect combination of delicious flavors! If you like a good salad and fresh flavors you will crave this thai cabbage salad too! I literally was driving home from an appointment today and stopped at the store for nappa cabbage to make this salad. I had all of the other ingredients but the napa cabbage. And Voila! Lunch was served. Yummy! I am excited to make it again. It has been cloudy and cool in Arizona lately and usually that means I crave comfort food. Stews and soups that are hearty and filling. Not today! I totally wanted something light and crunchy. We had some leftover rotissery chicken in the fridge and that is what I served with it for some protein. I also love this with Pecan Crusted Ahi Tuna with Mango Salsa! What Do You Need To Make This? This salad goes together in just a few minutes and is super easy to make! You will need the following ingredients to whip this up: One head of Napa Cabbage A bunch of green onions Shredded Carrots- you can buy them pre shredded or shred your own. A red, yellow or orange pepper or combination of them. Peanuts Gluten Free Soy sauce or Coconut Aminos Rice Wine Vinegar Sesame Oil Sesame Seeds Sugar or sweetener Optional ingredients: You can really add any veggies you would like to this salad. The Napa Cabbage makes it super crunchy and delicious. I sometimes add snap peas, apple, pear, or bean sprouts. First wash all your produce and allow to dry for a few minutes. Chop the end off the Napa Cabbage and separate the leaves. Slice the leaves of the cabbage the long way so they are bite sized pieces. This just makes it easier to eat. Then chop it up. Chop the rest of the veggies into bite size pieces. Toast the sesame seeds in a pan on medium heat. Stir so they don’t burn. Set aside. Make the dressing in a bowl. It has soy sauce or coconut aminos, rice vinegar, sesame oil and a little sugar in it. You could also add ginger or Chinese 5 spice to it if you want to spice it up. As well as Chili sauce if you really want to kick up the heat. Add the chopped veggies to the dressing in a big bowl. Toss. Add the peanuts and toasted sesame seeds. Voila! You are ready to eat. Pair this salad with your favorite protein for a complete meal. Pin This Now Make It Later! 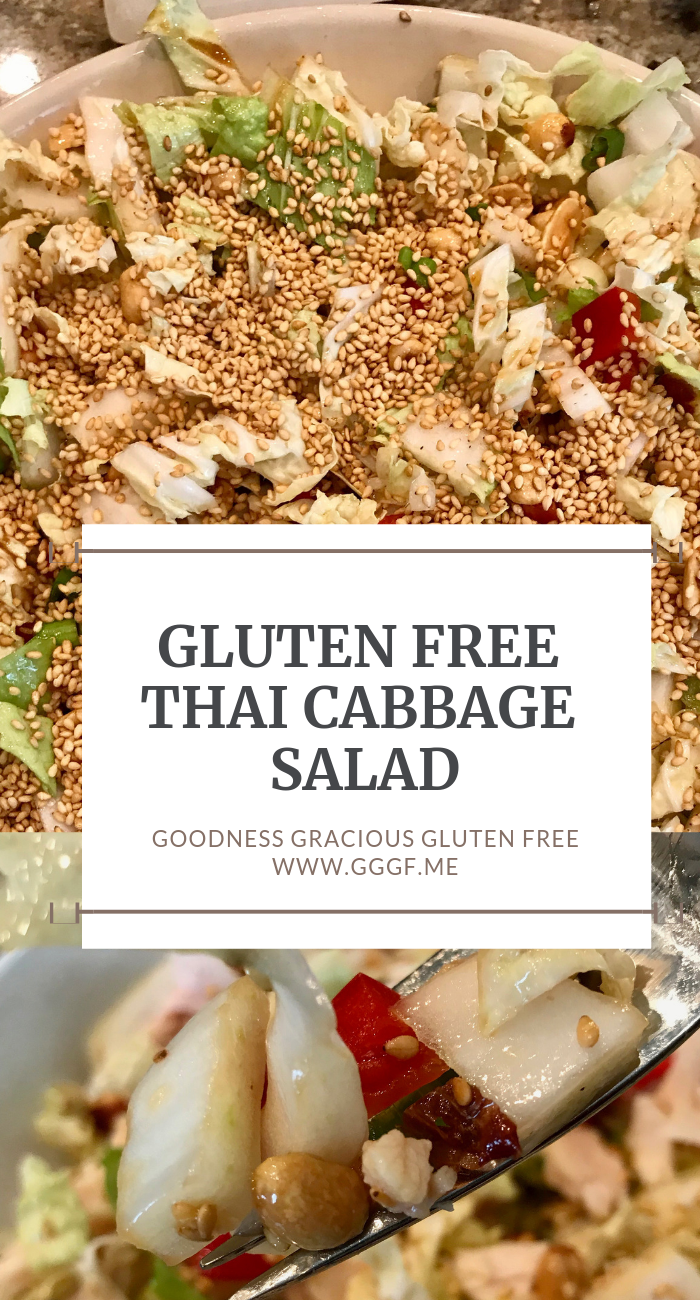 Here is the actual recipe for this Deliciously Crunchy Thai Cabbage Salad!
Gluten Free Crunchy Thai Salad You will love this deliciously crunchy salad full of flavor! INGREDIENTS
INSTRUCTIONS
As Always, Best Wishes for Gluten Free Dishes! XO, Michelle This gluten free Instant Pot Teriyaki beef is a quick and easy dinner cooked in the Instant Pot or Pressure Cooker! 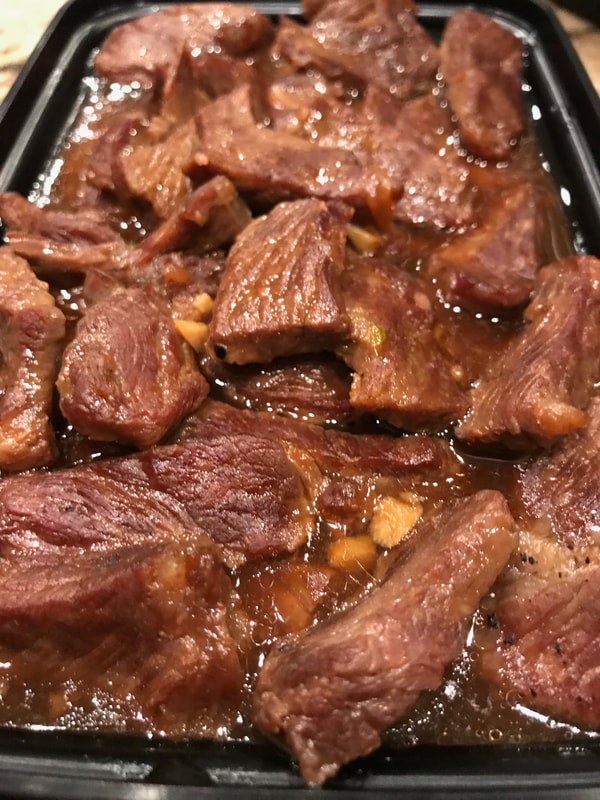 Did you get an Instant Pot for Christmas? If you received an instant pot for Christmas here is a simple recipe for you to make with your new gift and one of our favorites… Teriyaki beef! I wanted to make a recipe that my daughter in college could throw together in a few minutes and have a yummy meal. We bought her the additional ceramic insert so she can cook rice or other veggies at the same time as meat in her pressure cooker to make it more efficient. If you wanted to you could make this recipe with chicken or pork as well instead of beef. You can also add veggies if you want to! What Do I Need To Make This Recipe? You will need an Instant Pot or Pressure Cooker to start off with. Also: 2 pounds of sliced beef, pork, or chicken. I used a strip roast that I cut into thin slices. 1 cup of water 5 TBSP of packed brown sugar. Or less- I like mine less sweet but my family likes it sweeter. So the decision is yours 1 large garlic clove minced. 1/2 tsp grated ginger or powdered ginger. 2 tsp honey. 2 TBSP cornstarch. 1/4 cup water. 1 cup of water and 1 cup or rice if you want to make it in the ceramic pot. As well as any veggies you would like to add. DO NOT add the cornstarch and 1/4 cup of water in the beginning when you put the ingredients into the pressure cooker on sauté. You are going to make a slurry to thicken the sauce with them. A slurry is a mixture of a thickener like cornstarch or flour and a liquid like water that gets whisked together and added to thicken a dish. Here’s what to do with the ingredients: Turn your pressure cooker or instant pot on to saute mode. This allows you to bring the liquid to a boil and make your sauce. I love this setting for browning or precooking meat in the Instant Pot. Add all of the ingredients except the 1/4 cup of water and 2 TBSP of cornstarch. Whisk it all together. Continue to stir occasionally until the temperature comes up and it is getting thick. Once it is thick, turn the pot off. Add your meat and give it a stir to coat the meat in the sauce. If you want to add veggies you can do it now. If you want to make rice in the ceramic cooker, put the stand into the meat. Add 1 cup of rice and 1 cup of water into the ceramic cooker and put the silicon lid on top. Put it in the metal lifting rack. Place into the pressure cooker. Put the lid on and turn it on to manual pressure mode. Set the time for 20 minutes. Make sure it pressurized correctly and then wait for your food to be done. Super easy and delicious! Here’s the Video on how to make this recipe: Similar Recipes You Might Like: Cheesy Polenta with Crispy Onions Paleo Chili Stuffed Sweet Potato Honey Garlic Chicken Thighs in the Crockpot! Gluten Free Bacon and Pineapple Fried Rice Pin Now Make Later! 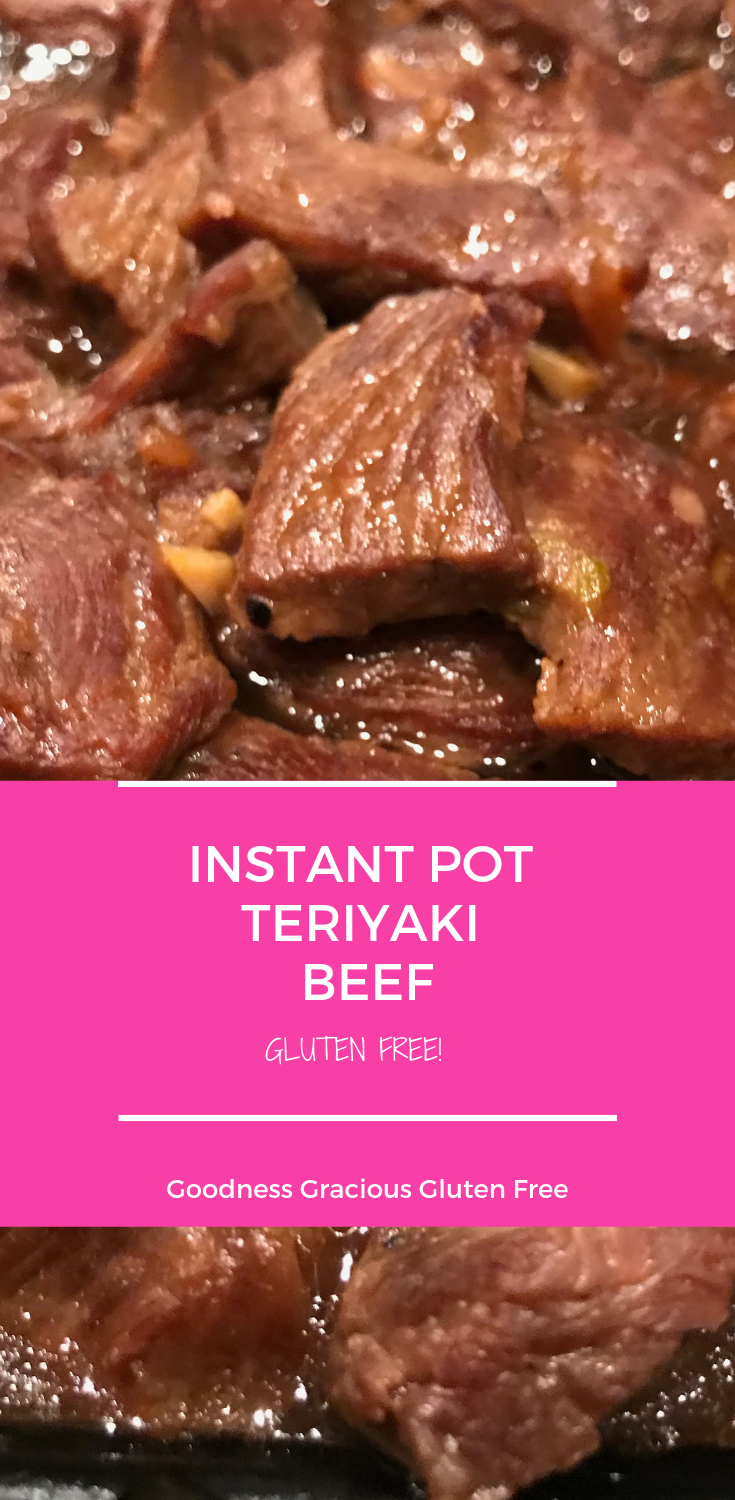 Here’s The Recipe!Instant Pot Teryaki Beef- Gluten FreeAn easy meal made in your pressure cooker or instant pot! Delicious and fast!
SERVINGS 4 people INGREDIENTS
INSTRUCTIONS
Hope you enjoy this recipe as much as we do! Feel free to play with the sweetness to your taste! I like mine less sweet but the majority of my family likes it with this much sweetness in it. Have a great rest of your day! As Always, Best Wishes for Gluten Free Dishes! XO, Michelle I love elk chili stuffed sweet potatoes! However, if you don't have elk meat you can substitute it for ground beef! 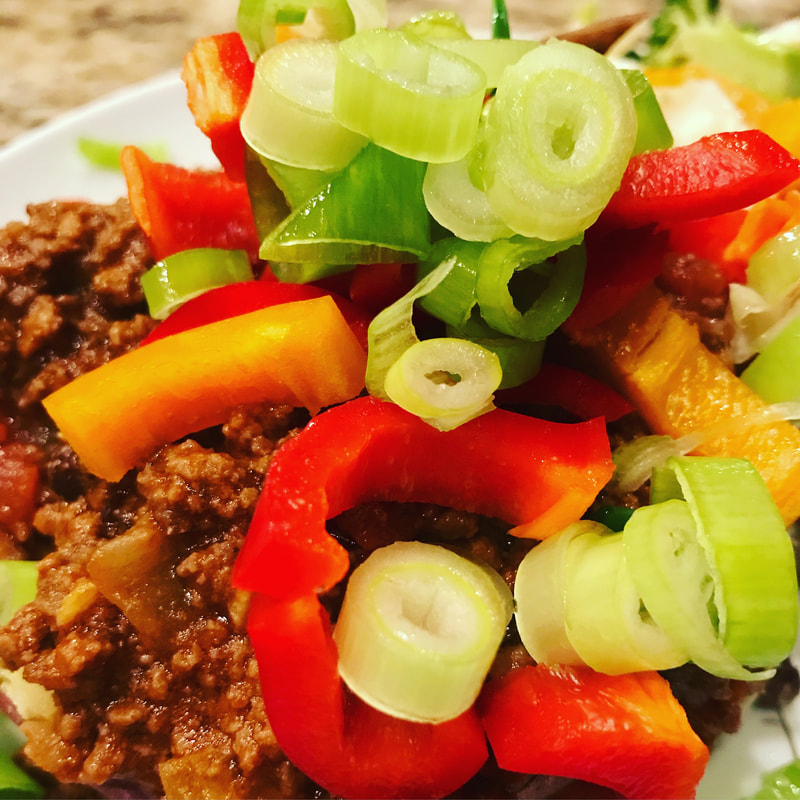 This gluten free paleo elk chili stuffed sweet potatoes are delicious and filling! You can substitute out the elk for beef if you don’t like or have elk. These Paleo Elk chili stuffed sweet potatoes are delicious and easy to make. You can make the chili ahead of time and then assemble for a quick dinner. I used my recipe from my Paleo Elk Chili and made it in the instant pot. This cooks it quite quickly. I microwaved a few small sweet potatoes and cut up some veggies for toppings and voila dinner is served. These stuffed sweet potatoes are a perfect weeknight meal because you can prep ahead and have dinner ready fast! I love using my Instant Pot to cook meals like soups and stews. It makes them so yummy in such a short time! I had such a fun time filming this recipe with my Mother In Law. She’s awesome and I love cooking with her. I didn’t eat much game growing up, but then I married into the family of hunters and I learned to love it. How Do I Make this Paleo Elk Chili Recipe? Begin by following my Paleo Elk Chili Recipe and make it either in a crockpot or Instant pot. If you don’t like Elk you can substitute it for ground beef. Paleo Elk Chili Delicious Paleo elk chili. I put the beans on the side for those who wanted to add them. It was delicious and I wish I had more elk meat in the freezer! SERVINGS 8 people INGREDIENTS
INSTRUCTIONS
Next you want to microwave enough sweet potatoes to feed your people. Chop up vegges to use as a garnish. I like: peppers, cilantro, green onions and olives. Cut your sweet potato so there is a slit in the top and squeeze it slightly so there is room to put the chili. Put the chili in your sweet potato and garnish! You can add cheese and sour cream if you don’t want to keep it Paleo. Enjoy! Watch Me Make this on YOUTUBE! Here are some other recipes you might enjoy! Paleo Paella Pressure Cooker Braised Short Ribs Beef Tips with Mushroom Gravy Poached Pears Hope you enjoy these Paleo Elk Chili Stuffed Sweet Potatoes as much as we do! As Always, Best Wishes for Gluten Free Dishes! XO, Michelle This gluten free medium rare strip loin roast was fantastic! It came as part of my Butcherbox so I wanted to share how I made it! 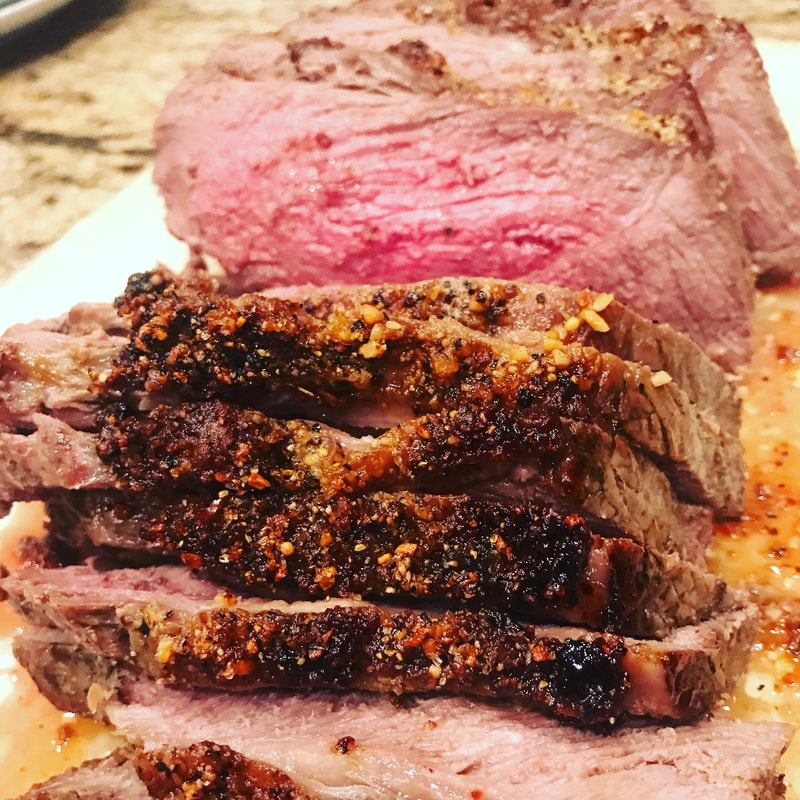 This gluten free medium-rare strip loin rost is full of flavor and perfectly cooked- IMO! I had never heard of a strip loin before it came in my Butcher Box, but that is because I am not really good with what different cuts of meat are called. 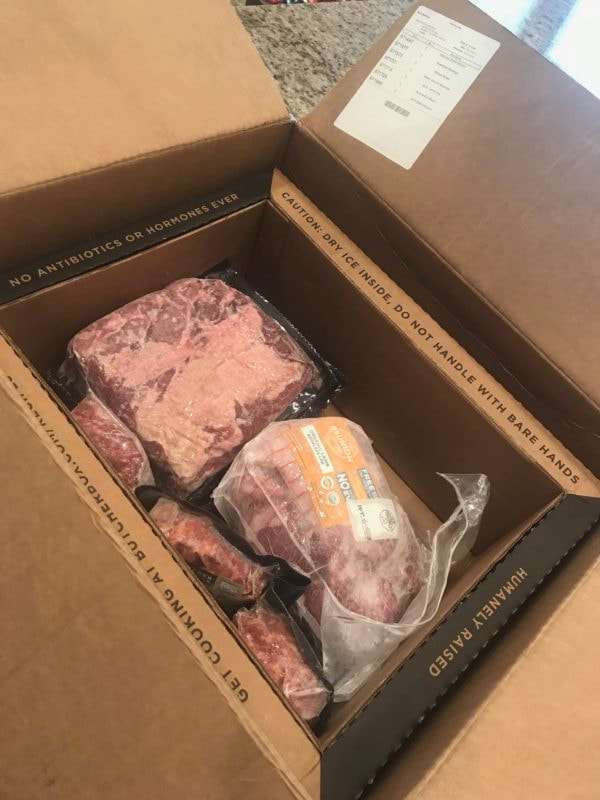 I decided to cook it in the oven, similar to how I make my oven prime rib roast and it turned out perfect! Use an internal meat thermometer so you can take it out as soon as it is medium rare.
I have been making a lot of holiday treats with more sugar than we eat all year, so I try to balance out our day with a nice protein for dinner with some lower carb veggie. For our family it’s all about balance! Why Do I order my meat? I order our meat because I want high quality, no hormones or antibiotics and humanely raised. I think grass fed is better tasting and better for our bodies because there are more nutrients and there is less risk of e Coli and other things. You can read all about it from Bulletproof Blog. They wrote a series about the benefits. How Did I make this roast?This strip loin roast was pretty easy to make! If you didn’t want it as a roast you can cut it into steaks to and BBQ them. I think it’s the same as a New York Strip then? Here’s how I did it: Take the meat out of the fridge for about 30 minutes before cooking. Turn your oven on to 450 degrees F. In a shallow baking pan drizzle a little Avocado oil. Rub your roast with Salt, Pepper, herbs and Garlic. You can use what ever seasonings you like. Insert an oven thermometer so you know when to remove the roast. I will post the one I use in the Amazon section below. Place in the roaster fat side up. This helps keep everything juicy while cooking as the fat can drip onto the meat. Can you say YUM!!! Place the roast in the oven and cook at 450 for 15 minutes. This will form a nice crust and make it really yummy! Reduce the heat after 15 minutes to 350 degrees. Continue to cook until your meat thermometer reads 130 degrees for medium rare. Remove from heat and let the meat rest for 15 minutes before slicing. Remember to slice against the grain of the meat to keep it tender. Serve with your favorite side dish! Enjoy! Side Dish Ideas: Here are a few side dishes you might like: Healthy Harvest Salad Easy Mashed Cauliflower Brussel Sprouts so good they taste like candy Here’s The Recipe: Medium Rare Strip Loin RoastMake this delicious roast for a delicious meal. It takes about an hour and a half to make but is worth the wait. INGREDIENTS
INSTRUCTIONS
I hope you enjoy this roast as much as we do! As Always, Best Wishes for Gluten Free Dishes! XO, Michelle |

Hey There!I am so glad you are here! Categories
All
Archives
June 2023
|

 RSS Feed
Click to upload Footer Background below